Jim Groom in my fridge

DancingJimGroomInFridge-bigger


So I was out of town for a week, and when I got home I opened the fridge to…what the H-E-double-L is THIS? Jim Groom in my refrigerator? Okay, I’m a bit creeped out now. At least he seems to be having a good time. Maybe he ate all the food and just left the sparkling water and the Metamucil.

This is the Dancing Jim All Over the World ds106 assignment, as part of the August 2013 GIF challenge created by Talky Tina.

This one was not as difficult as I feared it might be, in large part thanks to some very helpful instructions posted by Rockylou and Brian Bennett.

I used an earlier image I made for a ds106 daily create as the background and foreground for Jim.

The process


1. Opening and duplicating the background image

I opened (as layers) the wireless mic version of the Groom template that Talky Tina created into GIMP. Then I opened (as layers) the almost-empty-fridge-blues image I had from the earlier daily create assignment.

I put the fridge image on the bottom so that I could see the Jim layers above it—this made it easier to see where I needed to scale and move Jim’s layers.

I then duplicated the fridge image so that I had the same number of fridge layers as Groom layers.


2. Scaling and moving the Groom layers

There were 9 layers in the Groom gif, and in order to move them together and scale them together, I had to do two different things, as explained in an earlier post.

In order to scale all the Groom layers together (rather than one by one) I put them all into a “layer group” (click the link to see how to do this). Then I could scale them by right-clicking (or control-clicking) on the layer group folder and choosing “scale image.” I made Groom the right size to fit into the fridge shelf.

But I also needed to move all the layers together so they’d be in the right place. Unfortunately, due to some strange quirk of GIMP, you can’t move layers together in a layer group. Instead, you have to “link” them. Then you can move them all at the same time.


3. Creating a foreground in front of dancing Jim


I already had 9 fridge layers to act as background for the Groom layers, but now I needed to create a foreground for him too. To do that, I duplicated the fridge layer one more time, and then used the “lasso” or “free select” tool to select the shelf that would go in front of Jim.

I then created a layer mask on that image (go to Layer->Mask->Add layer mask) and clicked “selection” in the dialogue box. This made it so only the shelf was visible and the rest of the image was transparent. In GIMP you also need to “apply layer mask” to the image after adding it. You can do this by clicking on the layer with the mask, and going to Layer->Mask->Apply layer mask.

I needed 9 of these foregrounds as well as 9 of the original image as backgrounds. So I just duplicated the image that had the layer mask applied.


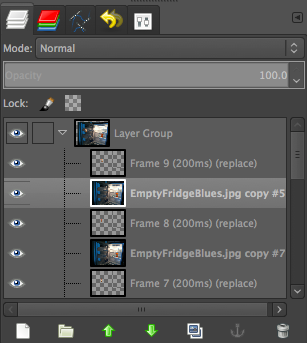
4. Putting Jim between the foreground and background, and merging

I first put a fridge layer under each Groom layer so that each Groom has a background. Then I put a fridge shelf layer above each Groom layer, so each Jim has a foreground.

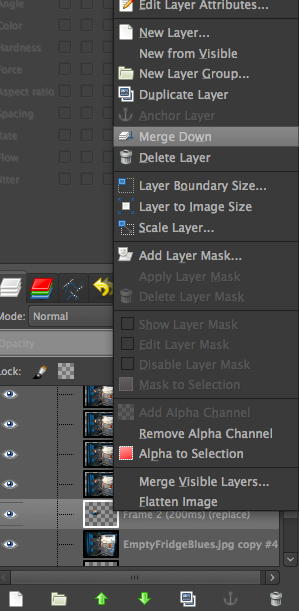
Time to merge down. First, I merged a fridge shelf layer with a Groom layer. Select the top layer and right or control-click to get the dialogue box and choose “merge down” (see screenshot). Then, I merged the fridge shelf/Jim layer with the fridge background layer beneath it using the same process. And repeat for each threesome of shelf, Jim, fridge.


5. taking layers out of the layer group

You can’t animate the layers in GIMP if they’re in a layer group, so you have to take them out. You can do this anytime after scaling and moving them, but I kept them in for awhile just to make sure they were in the right place.

Move the layers out by just clicking and dragging each to the top or bottom of the layer group, keeping the same layer order. Then you can delete the layer group by clicking on it and control- or right-clicking and choosing “delete layer.”


6. Changing the animation speed

Jim was dancing too fast at first, so I exported as gif again and changed the dialogue box on export to read 200 millisecond delay between frames. That got him about right, I think!

Now, if only I could get my act together and add some music! 


Headless Selfie

LosingHeadGIF2013

Who is really running the show?

Here is my headless self (see also here)—though actually, it’s less headless than showing some other head hidden behind mine.

Truth be told, who is really running the show is my 6-year-old son, but since I don’t like to show his image in public on the web, I used one of my cat Snapper instead. I was on sabbatical in Australia for a year, and during that time my cat was staying with my mom in Idaho. I’m there right now to visit and take Snapper home.

Talky Tina has started an August animated GIF challenge for ds106, and given how long this one took me, my chances of doing one every day are very, very low. But I’ll do what I can!

This was really, really challenging for me. I honestly wasn’t sure how to even start. And it didn’t turn out how I’d like—the wicker chair behind my head got animated at the top of my head and I honestly can’t remember how or why I did that. And my chin doesn’t disappear until Snapper’s head comes through. Can’t recall why that happened either.

The process

Here is a lesson for me (and others): if you’re going to blog about your process (which beginners like me sure do like because we learn a lot that way), then it’s good to take notes and screenshots while you’re doing the process rather than waiting until the end. Because I tried so many different things just to see what they would do, that by the end I wasn’t really sure what I actually did do that worked. And since I merged layers down after making layer masks and such, I no longer can get screenshots that show the process before the layers were merged.

Here’s what I remember—some notes I took last night right after I finally got this to work. I’m not sure it entirely fits what I did.

I used GIMP for this project, and two pictures: one of me, and one I took of Snapper yesterday.

1. I used the “lasso” or “free select” tool to do a rough selection around Snapper’s head. Then I used “create layer mask” on his layer, “to selection,” so that just his head was visible and the rest of the image was transparent. I also did the same thing around my head so that my head disappeared but the rest of the image stayed, so that then I had an image with my body and Snapper’s head. I had to move Snapper’s layer a bit to make his head fit into the “hole” I had made in my picture’s layer.

But that didn’t end up working well, because Snapper’s face shape doesn’t fit mine, of course, so I had to figure out how to get the wicker chair background behind Snapper’s head.

2. On a layer with my image, I created a background of wicker chair over my head with the clone tool. That was tricky—getting it to look reasonably realistic. I am still not entirely happy with that, but after spending a lot of time on it, doing it over and over, I finally just went with what I had.

What I can’t remember is how I determined how big to make this cloned wicker background so it would show up behind my head when my head disappeared and Snapper’s appeared.. Whatever I did, it didn’t fit exactly—more of the wicker chair animates than needs to.

3. I then put the image of me with wicker over my face under the Snapper head layer. Next, I made several Snapper head layers, each with a graduated opacity: 25%, 50%, 75%, 100%. I put the image of me with wicker over my face under each one, so that when Snapper was partly transparent, the wicker showed through. I then merged the Snapper head layers down onto the wicker chair head layers.

4. To do the same thing with my own face, I made a different layer mask on my layer than I did originally—one that allowed my head to show through and the rest of my body to be transparent. I put that one on top of the image with wicker where my head should be. I then created several versions of my head layer, again with different opacities: 100%, 75%, 50% (I just went to 50 on this one, not 25), and put the wicker char background layer under each of these—again so that when my head fades out there is wicker chair underneath it. I merged each “head” layer with the “wicker chair” layer under it, so each layer had my head at different opacities with the wicker chair underneath it.

5. I ordered these layers so that it started off with my full opacity image, then my head fades out 75%, 50%, then Snapper’s head appears 25%, 50%, 75%, 100%. Then I just duplicated layers so that the process went backwards in reverse order. And tried animating.

6. But GIMP animates from the bottom of the stack up, apparently (at least it did with this one…does it always? I don’t recall), so it started off with Snapper’s head, which faded out to mine, and back. So I had to reverse the layers. Searching on the web, I found that there is a tool in GIMP for doing this automatically instead of moving layers one by one (which I now vaguely remember doing at some point on another project). You just go to Layer->Stack->Reverse Layer Order, and voilà! It animated in the right order!

7. Lastly, I had to play with the timing of the frames so it animated a bit slower than the default. When you “export” and save as a GIF, you get a dialogue box that gives you a choice of milliseconds to delay between frames. It was at 100, but I changed it to 300. Then I had to click the check box saying to use that delay between each frame.

I expect there is an easier way to do this that wouldn’t take so long. If you know of one, please let me know in the comments!

Turn that frown upside down

Two paper worms; one is going into a pipe with DS106 on it. One worm's frown turns to a smile in this animated gif.

Turn that frown upside down!

This one has a bit of a story behind it.

First, there was a ds106 daily create that asked us to make a photo from the perspective of an earthworm. Here’s mine.

Then there was a ds106 daily create that asked us to make a photo story with a paper cutout in it. Rockylou made this one, which inspired me to make a worm one too, relating it back to my “perspective of an earthworm” shot.

All fine and good, except then Mariana Funes suggests we make the worms mascots for the Headless ds106 course in the Fall.

So of course we play along. Rockylou pulls her worm out of the trash and puts our two worms together in a photo. Nice! Except mine shouldn’t have an unhappy face when going into ds106.

So I decided that the more it became clear to my worm that where it was headed was ds106, the happier it became!

What we should have said: An alternative ending to The Twilight Zone, To Serve Man


I got the idea for this video from the ds106 alternative ending video assignment, except that one asks you to create a video, while I just did a mashup of other Twilight Zone episode scenes instead.

I wanted to do something that would use most, or ideally, all, of the episodes that all of us were to watch in the ds106zone (the May/June edition of ds106), sort of as a way to end my video work for the class by using things we had all seen. So I found clips that would work as what humans might have said and done to the Kanamits in order for “To Serve Man” to have a different ending.

Unfortunately, I couldn’t clips from every one of the episodes that were assigned for all to watch. So, for example, there is nothing here from “Eye of the Beholder,” or “Nightmare at 20,000 Feet.” I can’t recall if there is any other episode we all were to watch that didn’t make it in. I also added in some scenes from a few episodes I watched on my own, including “Howling Man” and “The Lonely” and “Bewitchin’ Pool.”

The process was fairly easy, though time consuming—rewatch episodes and decide what to use, then get the clips and import them into iMovie, where I put them together. Usually I didn’t include any transitions; only in one place did I use a cross dissolve—where Michael Chambers is lying in the spaceship at the beginning, and there is the wavy dissolving of his scene, showing a flashback. I used a cross dissolve to make the transition to the next clip smoother. Otherwise I just put them together with no transitions (what’s that called…jump cut?).

The only problem I ran into is that the video quality on some of the clips is no good. I think that’s because I had to import them into iMovie as “large” files rather than “full size,” because my poor little laptop is nearly completely full and I couldn’t make two copies of all of the clips (one original, one in iMovie) full size. The one from “The Invaders” at the end is especially egregious, though in a way it looks kind of cool, like comic-book style. When I get back home to Canada and have a computer with more space, I can do better video work!

Tina and Telly: A story of true friends

This video is a remixed version of, and a response to, Brian Short’s “Tina and Erich: A Love Story.”

Though Brian’s video is great in many ways, I thought a truer video would be one that showed how lovable Talky Tina is, and how Telly Savalas would, behind the scenes, love her and do nice things for her. That’s a real love story, not that mean one Brian Short did.

My goal was not only to make this video much nicer to Tina than Brian’s, but also even cheesier. Thus, I added super cheesy music and video effects.

The process

I took Brian’s original video and imported it into Apple iMovie, then cut out some parts by selecting them and choosing “split clip” (under the “clip” menu). I then selected the parts I wanted to cut and used the “delete” key.

I also wanted to make some of the clips in the original video run backwards to create the effect that Telly is actually being nice to Tina, not mean. I selected the parts I wanted, then used “split clip” again to separate them. Then, I clicked on the little “gear” symbol on the clip itself, and, under “clip adjustments,” ticked the “reverse” box.

I played around with slowing some of the clips down through the same route—under the “clip adjustments” section after you click on the “gear’ on the clip there is an option for slowing the clip down by any percentage you choose. You can also choose “slow motion” under the top “clip” menu in iMovie, but that gives you fewer options for speeds.

Brian’s video had some great repeats of clips, in which the same thing is done a few times, or the same shot is shown several times, moving in closer each time. I tried to replicate something like that in my own version, with a shot of Telly. I added a repeat of one of the clips of him, with the cigarette, by just selecting the clip and copying/pasting it right after the first one. I also used a “cross dissolve” transition between them to help it look smoother rather than a jump.

I did it originally three times, but that was a bit much, so instead I chose one repeat plus a “Ken Burns” effect on the last shot of the clip. This was done by selecting part of the clip, using “split clip” again, and then clicking on “crop, rotate and Ken Burns” on the middle part of the screen, right below where you edit the project. I had to play around with that a few times because I needed the “start” of the Ken Burns pan to be in the same place as the end of the previous clip, or the shot would jump going into the Ken Burns effect.

Finally, I used a special effect on the last clip: under the “clip” menu at the top, click on “special effect.” I used “flash and hold last frame,” which is how I got the last clip of the video to look as it does.

Of course, I added a few cheesy transitions here and there, lengthening them for effect as well.

Music

This was actually the part that took the longest. I did most of the editing on the plane to Northern Queensland (from Melbourne, Australia) where I’m on holiday right now—3.5 hrs. Then I spent two evenings looking for music. I wanted something really sweepingly emotional and over the top, something that would fit with the repeated shots/clips that seem overly romantic in the video. I just couldn’t find anything that fit exactly, so ended up with something that is a bit too happy and bouncy in comparison to what I was looking for.

I was only looking in two places for music at first:

Vimeo Music (which has some CC-licensed songs, and others that cost $1.99 for a license that allows you to use it for one project only, and http://incompetech.com/music/royalty-free/, which has music by Kevin MacLeod, who seems to compose music for film and stage projects (that’s a guess).

After an internet search I also found the Free Music Archive, which has lots of great music, but I didn’t find anything there either.

So of course, I turned to Twitter and asked people where they like to find free music, using the #ds106 and #ds106zone hashtag. I got several very useful suggestions from @cogdog, @techsavvyed, @scottlo, @indieschoollib.

ccmixter.org

jamendo.com

archive.org

soundcloud.com (which has some cc-licensed music)

And Ben Rimes has a nice page with several resources for “copyright and royalty-free media.”

The song I used was from ccmixter.org, called “We are in love,” which says it’s by “nhomas, featuring Shannonsongs,” though I don’t quite know what that means.

Questions:

1. The music I used is licensed CC-BY-NC, so I think that means I should license the whole video that way? Right?

2. But the only option on YouTube for licensing was CC-BY or “standard YouTube license,” so I chose CC-BY and tried to make it clear on the  description that the video is licensed CC-BY-NC. Why doesn’t YouTube allow more CC options? Or does it and I just don’t know how to find them?

3. The video quality of my version is significantly worse that Brian Short’s original. I used the “export” function on iMovie and exported it as a “large” movie. Maybe it’s because I downloaded from YouTube and then edited and then re-exported, and it loses quality that way?

P.S.

I have another video project in mind that requires pulling numerous clips from Twilight Zone episodes, but with the very spotty wifi and phone data service I’m experiencing while on holiday, I don’t think I’ll be able to get those clips onto my computer well until I get back home to Melbourne next week. So I’ll be a bit behind in getting my second video project done!