Link to audio mp3 (be patient—it may take a little time to download!): http://rockylouproductions.com/FileUpload/DS106/DS106_Headless13_AudioWk4_Review.mp3
Rochelle Lockridge and I had a great time recording a podcast this past weekend, talking about some of the fantastic audio that had been made the past week by participants in the Headless ds106 course.
Rochelle has already done a great blog post explaining how we managed to do the podcast itself, recording both video and audio. We initially posted it on YouTube because neither one of us had an extra 50 minutes of space available on Soundcloud, and I can’t upload files that big onto either one of the blogs I have right now (dammit—yet another reason to get my act together and get my Word Press install from my domain from reclaim hosting up and running. Yep, on my thousand-mile-long to-do list). I had no idea, actually, that Rochelle was recording video as well as audio, and I spent the first few minutes not looking very excited—it’s that face you have when you are just listening to something and aren’t interacting visually with someone.
I love how Rochelle was able to put together chicken gifs made by John Johnston (see his posts with those gifs here and here) into the beginning and end of the video, moving along in time to the music, which was the Mel Blanc and Sound Effect Man- Chicken Farm Song.
I wanted to give a tribute in some way to John Johnston’s chicken podcasts that he’s been doing for the Headless ds106 lately, and this was a great way to do so! You can hear his chicken podcasts by looking at this category on his blog.
The audio we talked about
Rochelle has already given the links to each of the works we discussed, on her blog post about this podcast, but I’ll put them at the end here too, just so I have them for future reference!
To find the audio I just searched Twitter, Google+, and the ds106 Headless blog flow for audio assignments from last week, checked that they were licensed to reuse, and if they weren’t I asked if we could play them.
I also wanted to point to Mariana’s blog post in which she suggests the radio show she wants to do with Talky Tina, for which she made the ds106radio bumper we talked about in the podcast. You can find that post here.
And I said something false about the ds106 rap by Stefanie Jeske. Somehow I heard that she said “It’s about us” in the rap, which isn’t quite right, but hey…that’s what my brain made out of part of her rap, because, I guess, that’s what it’s about for me!
Some tips/suggestions
Licensing and downloading—Soundcloud
Many people had made their works CC-licensed in some way, but hadn’t made them downloadable from Soundcloud. One of the great things about ds106, in my experience, is having people take what I’ve made and make new things from it—it’s like the ultimate validation, and it’s also like having a conversation with the other person. So if you’re willing to have that happen, or to have your work showcased in an audio or visual presentation of some kind, please do make it available to download!
On Soundcloud, it just requires ticking a box when you’re uploading your audio (you can go back and edit and do it later, too). Same thing for adding a CC license to your work on Soundcloud—you have to do that on purpose, as the default is blank, which means all rights reserved. And if it’s all rights reserved, then we can’t use it for this sort of purpose without your permission.
Amplifying if the audio is too soft/low, in Audacity
At one point in the podcast we talked about ways to make your audio louder if it’s too quiet. Rochelle suggested just duplicating tracks so you have two of one of them if it’s not very loud (though you need to make sure they’re lined up perfectly!).
Rochelle posted on her blog post about our podcast the sound effects story she did where she had to double the mosquitos track, but I’ll add it in here too, just for future reference.
I talked about using the “Amplify” effect in Audacity, and I thought I’d clarify something about that here.
In Audacity, you can select a portion of or a whole a track, go to Effects->Amplify, and choose how much you want to amplify the sound. Here’s what it looks like in a screenshot:
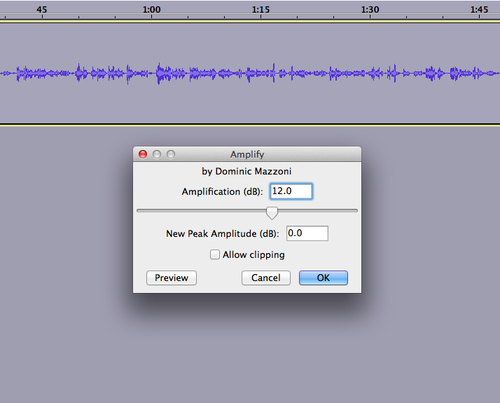
I wasn’t sure if you could choose to make the new peak amplitude 0 or not, but yes, that’s what the default is—unless you change the numbers, it will make the new peak amplitude 0, which basically (if I understand it correctly) means that it will be as loud as possible without clipping—without having some of the audio cut out because it’s too loud. I usually go just a bit below that, but not because I know for a fact there’s any good reason to do so. There probably isn’t.
Of course, if you want to allow clipping, you can do that with the Amplify effect.
You can also put in a negative number in the top box in order to de-amplify (there must be a word for that)—to reduce the size of the waveforms and how loud it sounds.
Noise removal in Audacity
I also mentioned that it’s possible to do noise removal in Audacity, which is especially useful if you have a track that has a good deal of ambient noise (like a refrigerator, wind, computer fan), or if you have had to amplify a track to get it to be loud enough, but have also amplified the ambient noise too (Rochelle says doubling tracks can help avoid this problem).
How this works in Audacity is explained nicely in this Audacity wiki page: http://wiki.audacityteam.org/wiki/Noise_Removal
It’s a bit tricky because you have to first select the section with only the sound of the noise you want to remove, then go to Effects->Noise Removal and click “Get noise profile,” as in the screenshot below. This lets Audacity figure out what the sound is that you want to remove.
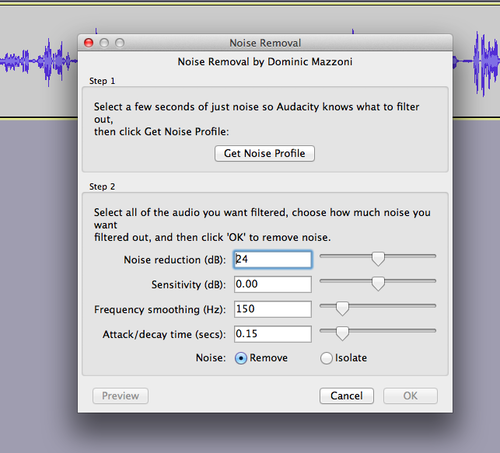
Then you select the whole track, go to Effect->Noise Removal again and then that time you can click “OK” (which, if you notice, is greyed out in the screenshot above, because I hadn’t gotten the noise profile first). You can play around with the settings in the bottom of the noise removal dialogue box if you know what you’re doing, but I don’t so I leave them as is.
Since you need a few seconds of just the noise you want to remove in order for this to work, it’s really helpful to make sure you wait a few seconds when doing a recording before you start speaking, playing music, what have you.
This is a good idea for other reasons too—if you need to insert some “silence” into another part of the track for some reason (as may need to happen if you have to edit some things out, change some things around), it’s useful to have the right “silence” to insert—that which fits with the rest of the recording. You can add in pure silence using Audacity (using Generate->silence), but it won’t sound like the empty bits in the rest of the track.
Sometimes you get a bit of a weird effect with this noise removal thing, as you’ll still get some of the noise during the “talking” part of the audio, but it will be more or less gone in the “silent” part, and you can kind of hear it go in and out. You can mask this if you want, and even perhaps remove the need for noise removal altogether if you add some nice background noise (like maybe a recording of being outside with birds, or a street scene), or use music behind dialogue.
Thank you!
Thank you to everyone who created audio this week! I’m so sorry if we missed any (we were aiming for just one from each person, so some people had more than one thing we didn’t include here), but we really tried to find it all.
And a big thank you to Rochelle for recording and editing this podcast during one of my busiest weekends ever. It wouldn’t have happened if it were just up to me!
Links to the audio we discussed
1. John Johnston: ds106 radio bumper dub number two: http://johnjohnston.info/106/ds106-radio-bumper-dub-number-two/
2. Mariana Funes: “Audio Giffing” http://theds106shrink.tumblr.com/post/61671781287/audio-giffing
3. Mikhail Gershovich,ds106 radio bumper: http://thisevilempire.com/blog/?p=931&cpage=1
4. Sally Wilson, “ds106 bumper” http://vibrantoutlook.wordpress.com/2013/09/17/first-foray-into-radio/
5. Cathleen Nardi, “Uncork at the cellar” ds106 radio bumper https://soundcloud.com/cathleen-nardi/uncork-at-the-cellar-ds106
6. Ary Aranguiz: sound effects story, “Invasion” http://alltheworldisamooc.blogspot.ca/2013/09/ds106-week-4-audacious-audio.html
7. Dave Barr, “The Banana Peel”–sound effects story http://gr8kree8.wordpress.com/2013/09/19/the-banana-peel-assignment-ds106/
8. Mariana Funes, sound effects story: “happily ever after…maybe” https://soundcloud.com/mariana-funes/happily-ever-after-may-be
9. Kevin Hodgson, “Sound Effects Poem: A Life in Draft” http://dogtrax.edublogs.org/2013/09/18/sound-effects-poem-a-life-in-draft/
10. Stefanie Jeske, “Stefanie’s ds106 rap” http://stefaniejeskestory.blogspot.ca/2013/09/stefanies-ds106-rap.html
11. Hayfa Majdoub, “What is Philosophy? https://soundcloud.com/hayfam/audio-recording-on-wednesday#t=0:00
And bumpers at the beginning and end:
Rocky Lou’s ds106 radio bumper mashup: https://soundcloud.com/rochelle-lockridge/ds106-bumper-mashup
Ary Aranguiz, ds106 radio Bumper1: https://soundcloud.com/ary-aranguiz/ds106bumper1