
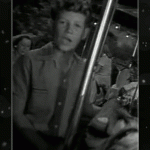
#ds106zone Animated GIF trading card—Young Martin Sloan, from the episode, “Walking Distance.”
————————————————————————————————
HELP! This animated gif card is 300 x 450 pixels, but Tumblr makes it into something huge! Any help on how to fix that?
I fixed it! It was something in my theme, called “scale images.” I now see why—otherwise, you get a black space around the image. But that looks better than the nasty pixelated thing I got when it scaled.
————————————————————————————————
I created a #ds106zone trading card earlier for Henry Bemis in “Time Enough at Last” (that one is also 300 x 450, but Tumblr made it huge as well), and I really wanted to make one that was animated. Finally, I managed it!
I had some extra hours in an airport due to a delayed flight, and I thought I’d just kick this one out quickly, since I already had the video bit I wanted. Ummmm…no. That I thought I could do it quickly shows how little I still understand of gifs and layers in GIMP.
The process
First, of course, I needed to make an animated GIF. I used the process described here, using MPEG Streamclip and GIMP. That’s really quite simple, once you get into the programs. You don’t need to know anything about either program to make a GIF this way—just follow the instructions.
I worked really hard to try to get Young Martin’s chewing animation to be smooth, as if it were just him chewing forever, but there’s still a blip. It was the best I could do, after numerous selecting of clips!
Then, I downloaded the ds106zone trading card template that Andrew Forgrave made, here. He’s got a nice set of instructions there that work very well for the still image trading card. But the animated trading card is rather more complicated, as I discovered.
In managing to do this, the following posts were invaluable: Andrew Forgrave’s post on scaling multiple layers in GIMP, and Jim Groom’s tutorial on making an animated GIF trading card.
To put the template together with the GIF in GIMP, here are my steps, following the instructions in the two posts linked above:
1. I first made sure the template layers were on top of the GIF layers.
2. I changed the text in the template to give the right character name, season, episode, etc.
3. Then I merged all the template layers into one layer, using the “merge down” feature in GIMP. Select the layer you want, then use Layer->Merge down (or, on a Mac, use control-click on the layer, and select merge down from there). This is because it’s necessary, according to Groom’s tutorial on making an animated GIF trading card, to put a copy of the template layer above each of the GIF layers, and I needed just one template layer to do that.
4. The GIF layers were not the right size for the template, and I had to do two things.
— First, I scaled them so they were big enough to fit into the template correctly. I followed Andrew Forgrave’s scaling instructions here (the post linked above). I had to create a layer group and put all the GIF layers (21 of them) into it, then scale the group itself. I selected the layer group and went to Layer->Scale Layer. That scaled all the layers in the layer group at once, which was handy. Of course, I had to move them all into the group individually in the first place, which is not so handy. Apparently GIMP doesn’t allow you to select multiple layers at once?
— But when the GIF layers were scaled, they weren’t fitting into the template correctly, so I had to move the layers to centre them better. But apparently you can’t use the move tool on the layer group even though you can scale the layer group. It didn’t work for me, anyway. So after some poking around on the web I found that one could link layers and move them together that way. Next to the “eye” icon to the left of each layer there is a space to the right, and if you move your cursor over that and click on it (it looks like a box when you move your cursor over it, but otherwise is invisible!) then you get a “chain” icon. Click for all the layers you want to link together. When I linked all the layers within the group together, I was able to move them all as one. I don’t know why that didn’t work using the layer group. But maybe I was doing something wrong.
— And yes, I did check to see if you could scale the layers together using the linking function instead of the layer group, and no, that didn’t work for me. So I had to scale using a layer group and then link the layers to move them as one. Again, maybe I’m doing something wrong, but that was the only thing that worked for me.
5. When I tried to use Filter->Animation->Playback, though, the GIF would no longer animate. I had to take the layers out of the layer group (one by one, again) to get it to animate. Not sure this is absolutely necessary, but at least it worked.
6. Following Groom’s instructions for an animated GIF trading card, linked above (and also here), I duplicated the template layer and placed a duplicate of it above each GIF layer.
7. Again, following Groom’s instructions, I then merged the template layers down into each GIF layer, so each GIF layer was the image layer plus template. I selected each template layer and used Layer->Merge down (or, again, on a Mac, cntrl-click on the template layer and use Merge down” on that menu that pops up). So then, I had 21 layers total, which was the same number of layers my original GIF had, only now each layer also had the template on it.
8. This should have been it—voila, fini, etc., but I realized then that my GIF layers were too big for the image, because when I scaled them to get the height right, the width was too big. I cropped the layers using Layer->Layer to image size. I did this one by one, though maybe if you used the “chain” function you could do it together? I don’t know.
9. Oh yeah—one more thing. Andrew Forgrave says in his post with the ds106trading card template that the template is designed to output at 300 x 450 pixels, so he suggests using a “save for web” option and resizing it then. I could find no such option in GIMP, especially since in GIMP you have to export it rather than save it in order to get a .gif file. So instead I just scaled the whole thing before exporting it as a GIF. I used Image->Scale image and set the width to 300 and height to 450 (automatically sets the height correctly if you set the width, as long as the “chain” icon next to the numbers in the scale dialogue is connected together).
And THAT is voila, fini!