
I was inspired to do this bumper by this one over at raptnrent.me. I loved how audio from a Twilight Zone episode was used in that bumper, and it gave me an immediate idea for how to use some audio from the Twilight Zone episode called “The Midnight Sun.”
I remembered that there was a scene in which Norma and Mrs. Bronson are talking in the hallway and they hear a noise from upstairs—the unnamed man who comes and threatens them to get water. I thought it would be cool to have a bumper with someone saying “what was that?” and it being just ds106 radio.
The process was quite simple, actually. I found out about Soundflower from the Scottlo #ds106zone daily podcast, the #LoDown, who got it from the raptnrent.me blog linked above—this is an application that lets you record audio playing on your computer, but unfortunately for some it is only for Macs (I have a Mac, so it works for me). Following the directions here, I used Soundflower and Audacity to record audio from the episode while it was playing on my computer.
The dialogue between Norma and Mrs. Bronson didn’t have any music behind it, which turned out to be a good thing because I wanted to cut some of that dialogue (and if there were music it would have skipped weirdly). I was able to easily cut some of the dialogue because there were just silent spaces between (or heavy breathing from Norma, from the heat). I wanted it to start with Mrs. Bronson saying she hadn’t heard a thing, but then go straight into “what was that?” afterwards. I skipped a few other parts of the dialogue as well.
BUT, I wanted there to be music throughout the bumper, so I recorded a section of the episode that had mostly just music. It was some part in the middle where Norma is just in her apartment and there is that oppressive “sun” music. At one point she goes to her window and burns her hand on the ledge beneath it. That’s when she does the quick suck-in of her breath you hear right before I start talking in the bumper.
So what I did was just start the music I had recorded as a separate track beneath the dialogue, and used the “time shift” tool to move it so that Norma’s breath-suck came right after the door slam at the end of the dialogue. The music seemed to work well when time shifting it that way…it built up very nicely as the audio was going along.
Then came the somewhat (but not very) tricky part. After Normal sucks in her breath, I wanted to do the bit where I talk, and I wanted music with that too. So I recorded some of the soundtrack to the episode from here into Audacity using Soundflower, onto a separate track. I wanted some background music as well as something that would be good to end the bumper with, so I chose a couple of sections from what I had recorded and cut and pasted the two different parts together.
But of course, if you just put sections of music together that don’t belong together, they sound weird. So here’s what I did. I added some silence (by cutting and pasting from a silent part of one of the recordings) right after the breath-suck-in, and then started the first piece of music over which I would speak. The nature of the music worked with just silence before it. I then used the “envelope tool” to fade that first piece of music down and transition to the last piece, the chord that ends the bumper.
Here’s a screenshot of what I’m talking about, with the top level being the dialogue between Norma and Mrs. Bronson, the middle being the music, and the bottom being my voiceover. You can see the “envelope” I created in the music.
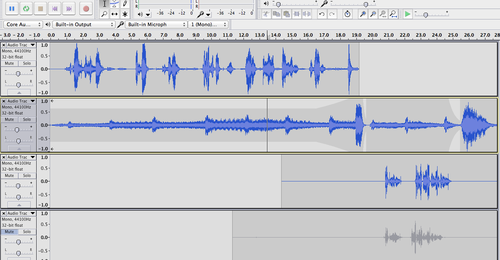
The fourth level is an earlier version of my voiceover. I did several takes, and kept all the versions just in case.
I should also say that when I first began I used “duplicate” on the dialogue and music tracks, to make sure that when I started cutting and pasting, I’d still have the original version of each track in case I didn’t like what I had done. Yes, you can use “undo” to go back to earlier versions, but if you’ve done a lot you have to go back a lot. And this way it’s easy to just start from scratch.
So this Audacity file has a lot of tracks right now—the original dialogue/the edited dialogue; the original music that goes before my voiceover/the edited music before my voiceover; the original music I cut from to go during my voiceover/the edited version of music during my voiceover, plus all the takes of the voiceover!
This was really, really fun to do, and only took me about 3-4 hours total, over two nights. Looking forward to doing more audio assignments!
P.S. I used to do this sort of thing a lot when I worked in college radio as an undergrad, but (and this is dating me) we used (gasp!) physical tape. We had to cut and splice tape with scissors and, well, sticky tape. All my work from that time is sitting on a reel to reel tape in a box somewhere in my house, or recorded onto a cassette in some other box in my house. This way is MUCH easier.

