Remembering and misremembering

Remembering and misremembering

The Story

This animated gif is for the second week of the Headless ds106 for Fall 2013, in which we were asked to do a gif of a scene from one of our favourite (or least favourite) movies.

I immediately thought of Memento, a film I really, really liked when it came out back in 2000. I had seen it a couple of times over the years, but decided to watch it again for this assignment. I found that I had forgotten much of the film, which is not unusual for me—I am not sure that I have a memory “problem” (and certainly nothing on the scale of Leonard Shelby, in the film), but I do have an uncanny knack of forgetting things quickly and easily and regularly. Not just the usual things, like where I put my keys, or what I had for breakfast (though, since I usually have the same thing every day, that’s pretty easy), but things like novels I’ve read, films I’ve watched, how stressed I was last time I taught courses in a certain way—a convenient one for when I’m planning new courses and have all these grand ideas about what to do and I forget how much time all that is going to take.

I do often find that I can re-watch a movie, or re-read a book after a couple of years and it’s almost like new again. Or at least, it has a tinge of the familiar, and a few things will really stand out as recognized, but for the most part it’s like having a new experience. Which is both troubling (what’s wrong with my brain?) and enjoyable (hey, I get to enjoy this story all over again!).

The main character in Memento, Leonard Shelby, is played by Australian Guy Pearce, whom I watched last year in two “tele-movies” filmed in my neighbourhood in Melbourne, where I was living at the time (here’s the trailer for one of them). He’s also pretty famous for his role in The Adventures of Priscilla, Queen of the Desert (trailer). When I first saw Memento, I didn’t make the connection to the Priscilla film, and didn’t realize Guy Pearce was Australian. Watching Memento this time around, I now have a sense of him as an Australian actor, so it was interesting listening to him speak with an American accent.

The main premise of Memento is that Leonard Shelby has a memory issue: after an attack that caused some neurological damage, he is unable to make new memories. Or rather, he can make some, but they disappear after a short time (it’s not clear in the film how long he can retain his memories, but something on the order of 15-20 minutes maximum, I think). After they disappear, he finds himself somewhere and doesn’t know where he is, why he’s there, or what he’s doing. He does, however, remember everything that happened before the attack.

To compensate for this problem, he often tattoos important things on his body, things he decides he must tell himself. He also tells himself things by writing notes to himself, but the really important ones are tattooed.

One of his memories from before the attack is of a man named Sammy Jenkins, who suffered the same problem that Leonard now does. Leonard was a claims investigator for an insurance company, and he denied Sammy’s wife’s insurance claim because tests indicated that physiologically, Sammy should be able to make new memories; the issue seemed to be psychological, and Sammy didn’t have insurance coverage for psychological issues (oh the joys of the U.S. medical and insurance system).

One of the great things about the film is that it is presented in nearly as disorienting a way as Leonard’s life must be—there are fairly short scenes that jump around in time, leaving the viewer disoriented and wondering what is going on. It starts at the end of the story, and while parts of it move backwards from there, other parts move forwards. It’s very difficult to get a handle on what is happening at any given time, until towards the end, when essentially you’re back at the beginning.

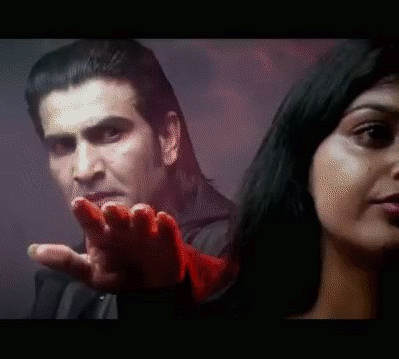
There is a lot more going on in the film, but that’s enough to explain this animated gif. I took parts of two different scenes: one where Leonard sees the tattoo on his hand telling him to remember Sammy Jenkins, and one that is a vignette of Sammy Jenkins in a psychological institution of some sort, watching someone go by.

Now, why does Leonard need to remember Sammy Jenkins? The idea given directly in the film is that Sammy couldn’t do well with his condition because he didn’t have a good system for writing notes and organizing them so that he could have a semblance of continuity in his life. But as the film progresses, and especially in the scene where Sammy is sitting in the institution watching someone go by, one begins to wonder if Leonard’s memory of Sammy is correct. Specifically, is Leonard mixing memories of his own life with those of Sammy? Sammy ended up inadvertently doing something very horrible; was it actually Leonard that did this?

“Remember Sammy Jenkins” is tattooed on Leonard’s hand, in a place where he’ll see it often (as opposed to under his shirt or pants, for example). It’s clearly important. But several times throughout the film Leonard is shown rubbing at this tattoo, as if trying to get it off. Trying to not remember. And perhaps he is trying to not remember what he himself has done by remembering it as Sammy Jenkins doing it instead.

At one point in the film, Leonard decides to consciously lie to himself, to write himself a note that he knows at the time is wrong, but he wants his later self to believe it and to act on the basis of it as if it’s true. Which, of course, throws all of Leonard’s notes to himself into question—how much of what he now believes as true may be his own fabrication? Not to mention a fabrication by others who are using him for their own purposes.

Beyond these interesting aspects of the film, it also raises larger issues about memory and our understanding of our lives and the world around us. Sure, Leonard’s memory is faulty, but so is all memory to some degree. And though he knows at one point he is lying to himself to make himself think differently in the future, later he won’t realize that’s the case.  And isn’t such a thing perfectly possible for those of us with “normal” memory, if even less consciously? How much do we alter our own memories without even realizing it?

I have fairly frequently been told I seem to selectively forget certain things, usually negative ones, and imagine the past was better than it really was. But I actually rather prefer it that way.

The process

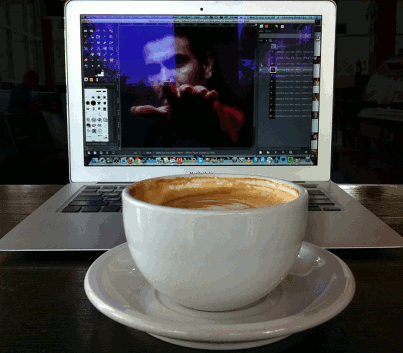
I found several clips of the film on YouTube, and downloaded them using Clip Converter. I selected the parts of the two separate clips I wanted using MPEG Streamclip, and then imported them into GIMP (see this tutorial for how to make an animated gif with MPEG Streamclip and GIMP).

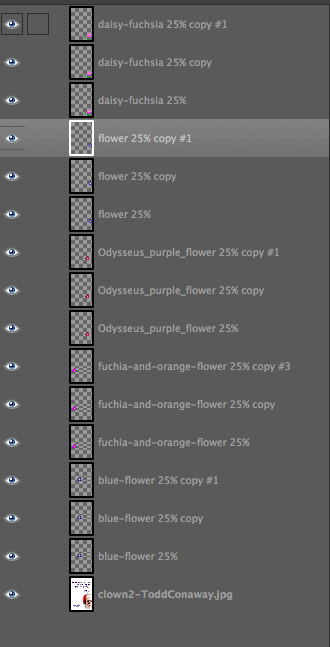
I had way too many layers/frames (they are both the same in GIMP) at this point…my animated gif needed to be 1MB or less to animate in Tumblr, and I knew I’d be way over that. So I just deleted every other layer, which is a nice way to save file size and still keep the animation pretty smooth. I also took out a few more layers at the beginning of each clip—anything that didn’t seem essential.

One thing I always run into with GIMP is that the animation works backwards—it starts from the bottom of the layer stack and goes up. So you have to rearrange the layers if you want it to go in the right order (sometimes this doesn’t matter, depending on the gif, but for this one it does). When I first started I moved layers one by one, but recently discovered that there’s an easier way to do it: go to “Layer” on the top menu, then “Stack,” then “Reverse layer order.” Voilà! Easy.

The file was still too big when I exported as a gif, so I had to make it even smaller by making the “canvas” even smaller (the dimensions of the whole gif). I just kept using the square selection tool and selecting smaller pieces, then going to “Image,” then “crop to selection,” then exporting as gif to see if it would be small enough. Even though the image was already b/w, I switched it to greyscale instead of RGB (“Image,” then “mode,” then “greyscale”). Not sure that made much of a difference, really.

Finally, while I wanted the tattoo clip to go a bit more slowly than normal, I wanted the Sammy in the institution scene to go quickly. The bit at the end of that clip goes by very, very quickly in the film—so much so that I had to watch it a few times to be sure what was going on. Can’t do that in a theatre! I didn’t want to slow it down too much, though it is slower than in the original film.

I managed these differences in speed two ways:
1. For the institution clip, I set the rate of each layer specifically: at the end of the name of each layer I put “(125ms)”, which tells GIMP to have that layer run for 125 milliseconds. I did that for all the layers in that clip.

2. For the rest, I just set a layer rate for the whole gif when exporting it; there’s an option to set the rate for all unspecified layers, which I set at 200 I think (maybe a bit more).

I had a lot of fun with this, and have been waiting several days to find the time to blog it. Glad I finally did!

601 backwards

DS106 Daily Create for Aug. 31, 2013 (yep, a couple of days late!): “This is TDC 601! That is 106 backwards! Draw something 106ish backwards.”

This one was challenging for me—I could make a video or a gif of something going backwards, but I was struggling with how to make a still image of something backwards. Okay, maybe draw the back of a kitchen monster that people created for TDC595.

But then I thought…what is something ds106ish? well, me! and you! So why not take an image of me backwards? Thus the mirror.
My original idea was to have my camera showing the ds106 logo on the camera itself, and then take a photo of that. Ha! In what universe did I think it would be possible for my phone to be using one application (to show the ds106 logo (on the web) and then also use the camera app at the same time? Not.

So I took the photo using the camera app (of course), and then did a screen shot of the ds106 logo from the ds106 page.

I opened both in GIMP as layers, and made a layer mask for the image of me so that the part inside the phone would be transparent and I could put the ds106 layer under that so it’d show through.
1. First, I drew a selection around the phone display with the “lasso,” or “free select” tool, so I could go around my finger on the camera button.

2. I then did Selection->invert, which makes everything around the camera display selected, which is needed for the next step.

3. Layer->create layer mask, which made the phone display transparent and everything around the phone display in the image show up.

4. Scale the size of, and position the ds106 layer so it’s in the right place, peeking out through the transparent hold in the layer of me above it.

5. Because the dividing line between the two images around the camera display was pretty sharp and harsh, I used the blur/sharpen tool to do a little blurring around the edge of the camera display. I think I did bit much of that, but no time to go back and fix it.

6. I also played a bit with the brightness and contrast and other settings under “color” for the ds106 layer—I wanted it to look a bit like it was glowing, shedding light on my finger and out beyond the display screen. That was a hard effect to get, and it’s not quite what I was hoping for, but upping the brightness did help.

P.S. tumblr sometimes bums me out. I don’t set my images to be as wide as this column, b/c that does weird things to them. But now it made this one have white lines a the vertical edges for some reason. Boo.

It’s not really a drawing, but I have yet to feel comfortable enough with drawing to do many of those. It’s one of the parts of ds106 I just need to force myself into to get more confident about it. Everything else I love doing; drawing, well, not so much.

Ahhhhhh! The hand! The hand!

Ahhhhhh! The hand! The hand!

This is for August Animated GIF challenge #10: Monster Chiller Horror Theatre 3D style GIF. It is also a new animated GIF assignment on ds106. The idea is to find a 3D style movie scene and somehow

find your own way to emphasize the moving of a thing out of the screen and into your face in a GIF.

I found this scene from a 3D Dracula movie trailer on YouTube.

I wanted to try to emphasize the hand moving out of the screen somehow, and came up with the idea of selectively colourizing it. I discovered that if I selected the hand with the lasso, or free select tool, and then inverted the selection (so everything but the hand was selected), then I could go to Colors -> Desaturate, and it would make what was selected b/w (everything but the hand) but not what was unselected (the hand).

I did a few layers that way, but then realized that what would be really cool is if it started off in full colour and gradually went to b/w except for the hand…like the hand was really coming out at you while the background was fading into, well, the background.

So for the layers that would be first in the gif, I kept the first two full colour, and then gradually desaturated the next few: 20%, 40%, 60%, 80%, then one at 90% b/c I wanted another step there. How I did this was to free select around the hand, invert the selection, then use Colors -> Hue-Saturation, and chose the amount of desaturation for each layer. Then the last layers of the gif were full desaturation.

What took the longest, of course, was doing the lasso/free select tool around the hand on each layer. There were a couple of layers where the hand didn’t move very much, so I could keep the selection from one layer and use that for the next layer too, for desaturation purposes. But for most of the layers (12 total, 10 desaturated to some degree) I had to do a new free select around the hand each time.

I actually started off with twice as many layers as I ended up with, and deleted every other layer to end up with half as many. That saved a lot of time, and made the gif file smaller. Desaturating most of the image made the gif file smaller too.

I realized too late that I wanted to have more of the full colour and gradual desaturation layers, so the desaturation was more gradual. But I’d have to re-do all the free selecting to change the saturation level on any of the layers. So instead I just slowed down the first few layers by putting the time in milliseconds I wanted them to last after the layer name (e.g., “full colour (300 ms)”). Then when I exported as a GIF, I chose something like 200 ms for all the layers that weren’t otherwise specified for length. The first few layers go a bit slower than the last ones that way. It’s not quite the effect I wanted, but it’s close. If I were to do it over again I’d have more full colour layers, and do the desaturation more gradually, over more layers, with just a couple at the end fully desaturated.

Finally, I used a new trick I learned from Alan Levine’s comment on my last post, as well as Talky Tina’s reply on Twitter: dithering. When I was done with the layers, I went to Image -> Mode -> Indexed (because GIFs get indexed when exported anyway), and chose the fullest number of possible colours (256 for a GIF) and clicked the check box for dithering. I played around with several dithering options, and just used the first, which is called “Floyd-Steinberg (normal).” And I didn’t get the colour banding I’ve been getting on my other GIFs! Sure, the quality isn’t perfect, but it’s an animated GIF, after all.

I had a lot of fun with this one, even if it took me awhile to finish because of the hand lassoing of most of the layers!

And I think my favourite part is that—ha ha!—Dracula never gets to grab the woman. He keeps trying and trying and he never does it. A nice twist on the fact that these horror creatures continually attack women. Not this time. In your FACE Dracula!

Why are my GIFs so pixelated?

This title is a bit of a misnomer. It’s a question I’ve asked, directly and indirectly, on this blog for the last couple of posts. And I think I’ve finally found the answer, so really it’s not so much why my GIFs are pixelated that I’m wondering at this point, but why others’ GIFs are not.

The pixelation I’m talking about

You can see it in the following GIFs I’ve done recently. Note, I’m using GIMP.

And what I’m talking about is that the colours get all pixelated. I didn’t have this issue with the GIFs I made during the #ds106zone—those were all black and white. That was a clue to what is going on…something with colours.

Why it happens (I think)

After numerous web searches last night, what I came up with as the cause is probably that the original images I’m using for the GIFs are in RGB colour, and GIFs have to be in indexed colour, at a maximum of 256 colours. So when the image is exported as a GIF, it reduces the colours and I get this.

The text on the Scottlo GIF is a different matter. I’m not certain what causes that, though maybe it has to do with anti-aliasing and semi-flattening, as discussed here? Ideas?

What can be done?

I don’t know. Any ideas? I thought at first maybe I was just out of luck because GIFs have to have smaller numbers of colours.

But that can’t be all there is to it, because other people have been making GIFs in colour and they look better. Sure, there’s still some of this pixelated colour stuff, but it seems not as bad, I think.  See, for example, GIFs by Talky Tina, John Johnston, Rockylou, Andrew Forgrave.

So what are they doing that I’m not, besides using other programs than GIMP, and can I do in GIMP what they’re doing?

Or am I just being too picky about how my GIFs look? Entirely possible!


Thanks to any and all who have ideas. Much appreciated!

How I feel when I have too much coffee.

How I feel when I have too much coffee.

I was making this GIF this morning at a coffee shop while working on another GIF that I still have yet to finish. That one will be posted soon.

August Animated GIF challenge #11 is making a wiggle stereoscopic GIF. Seemed pretty easy—take a photo from two different angles and make a GIF so it wiggles. But this, like all digital storytelling, is an art. And I have a lot to learn. This one does not look like 3D like these sorts of things are supposed to. Rather, it looks like a jumping bunch of confusion.

I should have made the angles between the two images less—I should have taken the photos without moving so much in between. Lesson #1. I wanted the coffee cup to wiggle but not the computer so much. But the coffee cup wiggles too much and the keyboard of the computer wiggles too much too.

I should not have had a great deal of the cafe in the background, because what I wanted to stay fairly lined up was the computer screen, which meant that the background in the cafe moved a lot, which was really really annoyingly dizzy-i-fying. Lesson #2. What I did (in GIMP) to help with this was create new black layers on top of each of the two images, then create a layer mask with a selection so that the black layer showed only in the cafe part behind the computer. I reduced the opacity of the black layer to about 90%, then applied the layer masks to the black layers and merged them down onto the two original images. So now the background is blacked out a bit and it’s not quite as distracting. But I could have used more black than this, even. Maybe nearly full black, because the cafe movement is still distracting.

I should not have had a glare on the computer screen, because that moves too much with the two images as well. Lesson #3.

And why is my image so pixelated? Really…this has been happening with gifs a lot lately. Is it the gif format?

But it’s late and I need to go to bed, so, well, it is what it is for today.

Even though this did not turn out how I would have liked, I learned a lot, which is a good thing too. I want to make another one sometime that looks better, and then I’ll post it to the assignments bank as an example. This one…not so much an example of the right thing to do!

The GIF on my computer in the image is taking a little while because I have to do something to it layer by layer, which is kind of a pain but I hope it will turn out looking good as a result. Hopefully tomorrow or the next day that one will be done!

Why didn’t Mr. Clown with flowers work like I thought it should?

So in my last post I posted a GIF I had made, and said that I had tried doing it another way that I thought should work but didn’t. I’m hoping someone who knows GIMP can help me figure out why it didn’t.

Looking at the GIF that previous post is needed to understand this one.

I thought I should just have been able to put the clown image on the bottom of the layers, then put in the flower layers on top of that in the following way:

For each flower, have three layers at 25% opacity. This way, I thought, they would fade in, 25% at a time, up to 75% opacity. They’d be above the clown layer, so would just fade in one at a time on top of it. Each flower would come in after another had already come in, and the first would stay there.

So I had my layers in GIMP like this.

image

But when I did that, here’s what I got as the GIF.

image

Ummmm…where’s the fade in? And why are they 100% opacity at the end rather than 75% like they should be?

The even weirder thing is that what I saw on the screen in GIMP, with all the layers visible, before exporting this as GIF, was this:

image

The flowers are at a different opacity, and different colours because I had messed around with the layer modes for some of them.

So why didn’t the exported GIF have the same colours and opacities as the image on my screen in GIMP?

I spent a long time last night trying to figure this out, and then finally just went with the really long way of making this GIF, which is explained in the previous post.

I don’t get it. Can anyone help?