Week four summary

I just finished two of my assignments about an hour ago. Here is what I did this week.

I spent most of my #prisoner106 time on my “I can read movies” book cover for “The Chimes of Big Ben.” I have really enjoyed seeing what else everyone is creating with these, and am going to take some time tomorrow to catch up on commenting on them.

I spent some time on a couple of different days doing a design blitz, which I really enjoy. And I learned that there are a lot of Cannabis dispensaries in the neighbourhood I was walking around in.

While I was out walking one evening I found a sign for Pennyfarthing Drive, and decided I needed to do something with it. So I did a colour splash assignment.

I have one more design assignment I want to be sure to do (the four icons one, because it has to do with an episode from this week that I am very puzzled by), but it will have to wait until tomorrow…


Pennyfarthing Drive

Pennyfarthing Drive

When I was out doing my design blitz in the Village the other day I discovered that there is a street called Pennyfarthing Drive in the Village. Well, of course there is.


Alternate version

I also did a red version. I’m not sure which I like better.

PennyfarthingDr


the process

This is really a “visual assignment” (last week) rather than a “design assignment” (this week), but oh well.

This was a problematic image to work with because it was not very light in the laneway where I took it, and there wasn’t much daylight left in the day. So the street sign didn’t stand out at all. I wanted to find some way to emphasize the sign.

First, I discovered the “burn” tool in GIMP (in the tool pane) and tried it out. I didn’t know what it did. On this b/w image it lightened things up. So I used it on the words on the sign, to brighten them.

Then, I decided to do a colour splash. This was a little tricky because I wanted two different colours, one for the sign and one for the lamp.

1. First, I duplicated the image a couple of times.

2. I added an alpha channel to the layer with the b/w image, and then used the “lasso” tool to select around the sign and then the lamp. I used Edit -> clear to delete the selection, leaving a transparent spot for each.

Screen Shot 2015-07-26 at 10.54.24 PM3. I had two other layers with the same image. On one of them I used Colors -> colorize to colour it green, and I did the same on the other to colour it yellow. Only I discovered something: I had the lamp still selected on the yellow layer, and when I did “colorize” it just coloured the lamp, not the rest of the image. Interesting.

4. On the yellow layer I selected around the sign and did the same thing as in step 2 to make the sign on the yellow layer also transparent. That way it would show through to the green layer below it rather than showing the sign yellow.

Screen Shot 2015-07-26 at 11.00.07 PM

Here’s a screenshot of the layers; the b/w on top, the yellow lamp, then the layer that got colorized entirely green.

Screen Shot 2015-07-26 at 11.00.43 PM


Design Blitz in the Village

It’s design week for #prisoner106, which means time to take pictures that exemplify design principles. We were to take images of things that show at least five of the following:

Screen Shot 2015-07-26 at 10.07.40 PM

A nice set of resources on these design principles can be found here.

I’ve done a couple of design blitzes before; one was in Fall 2013 and another in Spring 2014 (that one is on the site with my teaching and learning portfolio; I should put it somewhere else because now that site just has my portfolio on it).

I really enjoy doing these because it helps me understand these design principles, and it’s just darn fun! But I was really busy this week finishing that teaching and learning portfolio (it was due this week for promotion, and now I leave it alone for a year until I find out if I’ll be able to move up to the next faculty level). So I didn’t get as much done on this assignment as I wanted.


Color

IMG_1509
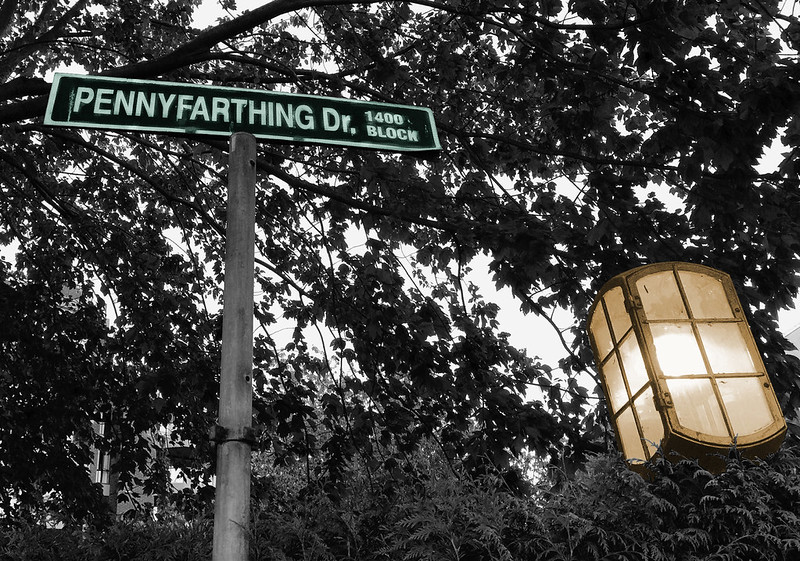
I was drawn to the use of colour in this sign for a couple of reasons. One, because I think it’s used effectively to draw your eye to the titles of the different sections, and to separate out the elements in the image on the far right. But I also like it because it works on another level: it’s about water (blue) and how to deal with it in an environmentally friendly way (green).

IMG_1510

I think this is a questionable use of colour in the words. When I put some type in different colour than other type it’s b/c I’m trying to emphasize something, to focus people in on some parts of the text rather than others. Here, I can’t tell what I’m supposed to be focused on. The white seems to stand out more, but could it really be that they want me to pay most attention to “your grocery list”?


Typography

IMG_1506

The typography here struck me because it’s clearly trying to hearken back in time, but then when you look at the “established” date it’s just five years ago. There’s something interesting in that juxtaposition. At any rate, they’ve managed to capture a retro feel with the typography and the arrows around “distillery.” the wrought iron holding the sign helps too.


Minimalism/use of space

IMG_1501

How much more minimal can you get? And yet, this is very effective. This place is tucked away in a part of campus not a lot of people go to, on the ground floor of a residence building. I think it’s pretty effective to let people know quickly and easily what can be found there. Once you get a bit closer you can see the name of the place (sign on the top left), but really, “food” and “coffee” are the most important messages.


Balance

IMG_1514

I see this design all over Vancouver, especially at bus stops. Usually there is some kind of roof that stops the rain, but this one doesn’t have a roof…not sure what the point is, then.

This seemed to me to be an interesting example of balance–it should feel off-balance, because the right side is much longer than the left. But it still feels balanced, to me. There’s probably some complicated mathematical or physical principle for why it’s not heavier on the right than the left (or maybe it is?). At any rate, I like this example of a not-balanced balance.


Form and function

IMG_1497

I don’t know if this really counts under the “form and function” header; this is a picture of a new earth sciences building on the campus where I work. On the bottom are panels of different sorts of stone, all labeled with the kind of stone they are and where the stone came from. It’s a building devoted to education that is itself educational.


Metaphors/symbols

IMG_1499The University of British Columbia is celebrating its centennial year in 2015-2016. I think this design nicely captures both the past and the future, even if the suggestion that UBC will live on infinitely is rather far-fetched.

IMG_1500

This sign is near some apple trees that are nicely placed on campus where one might want to just take an apple and eat it. I like that they’ve put on the sign a suggestion that you wouldn’t want to eat the fruit anyway b/c it’s full of worms. That’s maybe not what they intended but it’s a message one could get even unconsciously, perhaps.


A collection of Cannabis dispensary signs

I found one, then another, then another within a short space. Two were on the same block. I took the image of the first one b/c it seemed a good use of a symbol:

IMG_1512

The small plus sign on the left is a subtle connection of this establishment with medicine (as is the word “dispensary,” but that is already commonly used for these businesses). Putting it in green fits with the fact that this about a plant. And the large font for “CANNABIS” plus the smaller font for “dispensary” seems designed to catch the eye (it did mine). Of course, using “cannabis” rather than “marijuana” also indicates a more official, medical purpose.

IMG_1515

This one also uses the green plus sign as a symbol, along with the word “clinic,” which clearly brings up the idea of medicine.

IMG_1517

And what says “medicine” more than an image of a doctor with a stethoscope? And a sort of clever attempt at connecting “Canada” to “cannabis” in the name of this place. But why does it matter if we get the impression that it’s Canada-wide? (I have no idea if it is.) Maybe it seems more legit?

Also, this was the third one in just a few blocks and I was starting to take pictures of them just b/c it was funny after awhile to see so many ….


I can read tv (2.0)

One of the assignments for design week for #prisoner106 was to do the “I can read movies” assignment.

I have tried this one before, when I first started doing DS106 back in 2013; this was one of the first things I did in GIMP (not the very first, but I wasn’t that used to GIMP before I tried it). It nearly killed me. I spent all week on that one assignment, and came out with something that only looked sort of like I wanted. The basic design was pretty right on, but it didn’t turn out how I wanted it to.

Here’s my first attempt at this assignment:

What I made in 2013
What I made in 2013

And here is the blog post detailing all my woes with it. So many woes there were.

I was really reluctant to do this assignment again, but realized I should get back on that horse and conquer it.

This time I decided to try using a texture layer to make the cover look more like paper. I got the idea from this tutorial about photoshop. I use GIMP, but the basic idea is the same. Then Kathy Onarheim suggested this video tutorial by a former DS106 participant. That one was really helpful because it brought me to see that I needed to put the texture layer on top of the other layers. I had it below the text and other image layers and the effect wasn’t as good.

So here is “I can read tv” 2.0.

This image is licensed CC BY-SA 4.0

I liked the point in this episode that it all hinged on the watch of the guy who was supposed to be in Poland (was it Poland?). Maybe it wasn’t a single hour off, but the saying at the bottom seems catchier with just “an hour.”

Overall I’m pretty happy with this one, much happier than with 1.0.

The process

This one only took me about half the time of the first one (so like 3 days instead of 7!). I learned from the first version that when you try to import images into GIMP and re-colour them, things don’t work out so well. That’s why the hand and glasses on 1.0 are so pixelated. So I didn’t even try that. Instead, I managed to get the black background at the bottom by using a particular layer mode for the texture layer, as explained below.

1. I started with a white background, and downloaded this set of paper textures. The author says you can do whatever the [bleep] you want with them. S/he just asks for a link to what you used them in. Which I’ll try to remember to do when this post is finished.

2. Images used:

3. Fonts used:

  • Like with 1.0, I used “Dream Orphanage” from dafont.com for the “I can read tv” logo. I also used it for the “Number” and “1/6” in the box, as well as the tagline at the bottom. I think I also used it for the “copyright” notice on the left.
  • For the title of the episode and the “The Prisoner Series” at the top, I used Mermaid from dafont.com.

4. The line and rectangle: I still am not terribly happy with these. They were too heavy in 1.0, and still too heavy in 2.0. I used the “rectangle” selection tool to create a selection and then fill it with the “bucket fill” tool. There’s probably a better way.

5. At first I just created the book cover with the paper background as is, so it looked like that background with the text and images. It felt a little like just a piece of paper rather than a book cover. So I took the advice in the video tutorial linked above and

  • desaturated the texture
  • played with different “modes” for that layer

The “difference” mode made the black background with the white image of the penny farthing. I liked that, but then had to change the colours of the text because they turned from red to a kind of teal colour. So I recoloured the text teal and then with the “difference” mode they turned red.

5. How I did the clock face:

  • opened as a layer
  • added alpha channel (right-click the layer, then “add alpha channel”) so it had a transparent background
  • selected around the clock face with the circle select tool (the clock face on that image isn’t a perfect circle, but it was pretty close), then used “selection -> invert” to select everything outside the clock face.
  • then I used “edit -> clear” to get rid of everything outside the clock face
  • scale layer and move to get it the right size and in the right place; I had to use the “eraser” tool to erase around some of the edges so that you could see the outside of the penny farthing wheel around the whole clock face (since it wasn’t a perfect circle to begin with)
  • “colorize” the layer teal so it turns red under the “difference” mode for the texture layer
  • change the opacity so you can sort of almost see the spokes of the penny farthing behind it

6. Now I had a purely black background, which looked something like this (this is an earlier version, which had the “public domain” icon in the place of the “copyright” icon, before I remembered I had to make this CC BY-SA b/c of the clock image).

ICanReadThePrisoner-black

But I decided I wanted it to have that off-white top like some of the original “I can read movies” images.

So I had to add some more complications. I just couldn’t leave well enough alone.

7. I added another layer of the paper texture and added an alpha channel (see step 5, above). Then I used the rectangle select tool to select just the part I wanted to have the off-white paper texture behind, and went to layer -> crop to selection. That meant I had a layer that looked like this:

Screen Shot 2015-07-25 at 10.48.34 PM

So just the top had the off-white paper texture. Then I had to move the text and line/rectangle layers above it so the paper texture wasn’t covering them.

8. I wanted to make the top, off-white section look more worn and dirty, so I used several grunge brushes I had downloaded for GIMP and played around with size, opacity, colour, etc. I also did some brushwork over the penny farthing b/c it was too white.

9. Lastly, some of the black section was too light, and I wanted it darker. Since it was on “difference” mode, I had to use my brushes with a white colour to get darker patches here and there.


#prisoner106 Week 3 summary

It’s an hour before our week 3 summary is due, I’m tired, and I didn’t do everything I was supposed to do this week. I wonder if they’ll turn off the electricity to my bungalow? Only allow me as much food as my meager credit units for this week can buy? Send me back to the hospital?

During my visit to the hospital last week I woke up and discovered some strange blue stripes on my legs. This week I found, on my phone, another strange image, this time even more disturbing:

IMG_1465 (1)

I’m rather concerned, to say the least. And what could those letters mean? Why are there three F’s and only one B?

Despite this disturbing discovery, I did manage to do a few things this week:

Daily Creates

I made a poster for the Public Domain Review (daily create 1282, for July 13, 2015). After posting it as CC BY, I thought: silly me, why not post it CC0, which you can do on Flickr now? So I did.

Don't wait for your beard

And I made an image with “magical light” (daily create 1283, for July 14, 2015)

Ghostly lights

Prisoner photo safari

One of the visual assignments we were to do this week was a photo safari. Here are the photos I took while walking around The Village.

I got a little sneaky with a couple of these, and where it said “City of Vancouver” I changed it to “City of Village” or just, “The Village.” That was fun, but it’s kind of subtle (except on one where it’s pretty big).


Animating #Prisoner106

Though I plan to make more, so far I’ve done one animated gif of The Prisoner.


Now, it’s lights out in my bungalow. Will they come back on tomorrow?


GIFing A, B and C

For week 3 of #prisoner106, we were asked to do the “Animating The Prisoner” assignment.

I struggled with this one a lot for some unknown reason. I love making animated GIFs from video because technically, it’s pretty easy once you get the tools.

What I struggled with was finding sequences to animate from the episodes I’ve seen. I have a couple of ideas, but as this assignment is due in 1.5 hours, I figured I just do one so far and post it here.

In “A, B, and C,” Number 6 is drugged for two nights in a row and taken to a room where his dreams show up as videos on a screen, and they are manipulated from the outside to see if he was going to “sell out” (they wondered if maybe that’s why he retired). I was struck by the fact that there are two very similar sequences where the camera zooms in quickly on his wrist, where there are marks from the injections. In the first sequence, there is just one mark b/c it’s after the first night. After the second night, there are two.

I decided to animate these sequences to make it seem like it was just one mark, then he looks again and now it’s two, then he looks again and now it’s one, etc., etc.


OneMarkOrTwo-Prisoner106

The Process

I’m not sure I could explain it any better than is done in this great tutorial given here. I used MPEG Streamclip and GIMP as suggested in that tutorial, and used the settings given there.

I took a sequence of him sitting on his bed and then suddenly looking at his wrist and just duplicated it so it looks like he is doing the same motion but having different numbers of marks on his wrist every time he lifts it to see.

I keep getting a little frustrated at the pixelated colours on my gifs, but then discovered that the .gif format will only take about 256 colours, so there’s really not a lot you can do about this from what I can tell, when your source files have lots of colours and the gif will only have that many.