New Year’s message (TDC 1089)

MessageInBottle-tdc1089-Jan2015

ds106 daily create for January 1, 2015: “If you could write a New Year message in a bottle what would it say?”

I did this with GIMP, starting with a background for which attribution is given below. Then I used Chancery Cursive font and made it a bit “dirty” by using a paintbrush with a grunge pattern and kind of dabbed lighter colours on the words.

This is something I need to tell myself over and over, not just on New Year’s Day! It is pretty powerful to think about what, when I’m old(er) and grey(er), I will wish I had done more of. It’s not that I don’t like my job–I love it. But I really shouldn’t let it take up as much time as I do.

Paper background:

Aged Paper Texture, flickr photo shared by Essence of a Dream, licensed CC BY 2.0.


This small patch of pond

ThisSmallPatchOfPond-tdc892-med

ds106 daily create for June 18, 2014: “Go out into your yard (or jump the fence into your neighbor’s yard) and find an interesting piece of ground. Zoom in with your camera’s lens, and take a picture. Share your square piece of Earth with the world.”

So it was kinda late by the time I got to this daily create, and I cheated by making it a patch of pond rather than a patch of earth, and even more by taking a photo of a patch of pond on our kitchen counter.

My son, 6 years old, is raising tadpoles in a very large saucepan. We have gathered rocks, pond water, and water plants and made a small environment for them. We feed them boiled lettuce, which they seem to love, and change half the water every day. It’s really fun–one of them has newly grown legs!

I played around a LOT with the macro lens and settings on our camera, and eventually needed to set up the tripod and set the timer delay to 2 seconds so that my pressing the shutter button didn’t shake the camera. This was the best out of the shots.

 Here is the photo on Flickr.

Mama and Boo Ghost at the aurora

MamaBooGhostAurora-June2014

I decided to combine the ds106 daily create for June 6, 2014: “Make a picture of yourself in a place you’ve always wanted to go but haven’t been yet” with my participation in the summer ds106 experience over at https://thebergerons.wordpress.com/

So here is the Boo Ghost and me as Mama Ghost at an aurora. I’ve always wanted to see an aurora borealis in person, but never have.

The background image of the aurora is by Omar Smith, and licensed CC-BY.

The process

In GIMP, I opened up both the aurora image linked above and an image of me and my son in Australia from September 2012. To cut us out of the original image I used the process described here, which involves using the “paths” tool–something I’ve never done before. In case that page disappears, here are the steps.


1. Click on the “paths” tool and go around the parts of the image you want to “cut out.” When you reach the first path marker, be sure to hold down the “control” button when you click that first marker to close the loop (although if I remember correctly, on my Mac the control button didn’t work and I think I had to use the “command” button, but my memory is fuzzy on this).

— Then you can move the anchor points around with the mouse to adjust where they are and adjust what is being outlined, which is nice.


2. In the window that has the layers in GIMP (see screenshot below), click on the little white button that looks like it has two sliders. You should be able to there choose “selection from path” (you can’t see it in the screenshot because I’ve already done it and I can’t recreate it…this is just to show the white “slider” button). This creates a selection from the path.

Screen Shot 2014-06-06 at 7.42.10 PM

3. Create an alpha channel–this means to give the image transparency, so when you cut out part of it you don’t get white space but a transparent space so the image underneath it will show through. Go to “layer” on the top menu and choose “transparency,” then “add alpha channel.”

— This step is really important for the part where I had to erase something (see step 5).


4. Now you need to cut out the background from what you’ve selected, so you need to invert the selection and cut out that part. Go to “select” on the top menu, then choose “invert.” Then you can just use control-x or command-x (for the Mac) to cut out the background. You should just have the piece you created a path around on a background that looks like a checkerboard (see top layer in screen shot above).


5. For mine, I still had part of the original image between myself and my son, between my left arm and his right arm. I needed to get rid of that, so I just used the “eraser” tool and erased it. What was underneath was just transparency, so the aurora image showed through. If I hadn’t added the alpha channel, when I erased part of the image I’d get a white space there.

— I also needed to erase around some of me and my son because there was a bit of the original image around the edges, which looked strange


6. I had to scale the layer (top menu: layer->scale layer) to make it a bit smaller, and then move it where I wanted.


7. Then the fun began with playing with the colours of the layer with me and my son. I just messed around with Colors->Curves until I got something that looked kind of ghosty. Then I reduced the opacity of that layer (with the slider on the top of the screenshot above) so we were kind of transparent. Finally, I used the “blur” tool to go around the outlines of me and my son so we didn’t have such sharp outlines. It made us blend into the background image a bit more.


8. I didn’t collapse the two layers into one (which you could do by right-clicking on the top layer (or control-clicking, on a Mac) and choosing “merge down), but left them separate in case I wanted to adjust the layer with me and my son more. Having it separate means you can adjust colours, etc. on that layer alone.


9. I then exported as a jpg and voila…


Headline Mashup Visual

Vader-JarJar-Selfie
ds106 dailycreate for December 5, 2013: “Create a visual that might accompany one of the mashed up headlines from @twoheadlines.”

The original tweet: https://twitter.com/TwoHeadlines/status/407970369447161856


So this is supposed to be Vader taking a selfie but it’s Jar Jar that appears as his own image instead of Vader, like Vader is actually Jar Jar. Now that I think about it later, though, it just looks like he’s watching Jar Jar on the ipad. D’oh. My idea was a little too complicated to come out well in a visual image. Oh well…it took me long enough to get this done at all I’m not going to go back and fix it now.


The process (in GIMP)


I got the Vader image from the GIF Fight tumblr from August 2013—I had remembered this image from last summer. You can see the cool gifs people made with this image on the GIF Fight tumblr arhive for Aug 2013.

I then got an image of an ipad from Flickr; it took awhile to find one that was in approximately the right angle. Here’s the one I used: “iPad car mount,” by Jan Hammershaug, licensed CC-BY.

Lastly I had to figure out what should be on the ipad screen. I tried to find a good Yoda image that was openly licensed, but no dice. So why not Jar Jar Binks? Here’s the image I used: “Jar Jar Binks at SGTTC2010,” by Parka, licensed CC-BY-SA.

I first put the ipad in Vader’s hand by scaling it to the right size and then selecting around it by going to Select->Float, then Layer->To New Layer to get the ipad onto a new layer. I then deleted the rest of that image with the ipad.

I got Vader’s finger in front of the ipad the same way: I selected around the finger, floated the selection, then put it on a new layer so I could put it in front of the ipad.

Then I selected around the original image that was inside the ipad frame, did Select->Float and then Layer->to new layer to get that image out of the ipad frame. I then deleted the new layer with the image that was originally inside the ipad frame.

Finally, I had to crop the Jar Jar image and scale it so it would be small enough to fit inside the ipad frame.

Now I had layers in this order:

1. finger

2. ipad frame

3. Jar jar

4. the rest of the vader image

But of course, the Jar Jar image wasn’t at the right angle to look like it was actually on the ipad. That’s when I discovered the “perspective” tool in GIMP, which lets you warp a layer so it takes on a new perspective. I played with this a bit, moving various corners various amounts to see what it looked like, until I got the perspective looking pretty good.

I also had to play around with scaling the Jar Jar layer so that it didn’t stick out the sides of the ipad frame but still fit within it. In the end I had to use the paintbrush tool to cover over some parts of the image that were a little too small for the frame and some of the background was showing through. But it works okay.

I’m amazed I got this to look pretty much like I pictured it when I thought of it.

This image is licensed CC-BY-SA: https://creativecommons.org/licenses/by-sa/3.0/

#ds106 Design Safari

Week 6 of the Headless ds106 course is about design. When I did ds106 in May/June of 2013, for the “ds106zone” edition of the course, I ended up pretty much skipping design week. Well, I did one assignment during that week, which I really struggled with. I didn’t do many of the suggested readings or watch suggested videos. I just wasn’t that into it.

Why? I think I have some kind of mental block when it comes to design, and I believe it has mostly to do with lack of confidence. I feared, when I started ds106 earlier this year, that I just wasn’t very creative and thus would suck at doing this stuff. That turned out to be totally false (as I kinda guessed it would), but somehow I still have that sense with design. It’s even more deeply ingrained for some reason that I just don’t get it and maybe never will. Okay, that’s also complete bullshit and I need to get over it.

So this week I decided I would spend as much time as I could (which admittedly isn’t very much right now) doing readings on various design principles—here is the document I was working from. I decided also to do the “design safari” (see the above link for the week 6 announcement). The idea is to take photos of various objects that illustrate four of the design principles discussed for this week (either as examples of good design, or bad).

I found this activity really, really fun and informative. It helped me understand the design principles much better than I did just by reading about them. Here’s what I managed to do.

Color

I have to admit this was the part of the design document linked above that I had the hardest time with. I kind of understand the idea of the colour wheel, and the differences between hue, saturation, value, chroma, but I found it difficult to determine just what might make for a good use of colour versus a bad one.

This post was helpful—it pointed out that colour can be used to group related things, such as how “repeating colors on elements like page headings gives an immediate visual cue that those headings are related.” The post also noted that “a small dose of color that contrasts with your main color will draw attention.” I’ve been doing this already, in my slides for lectures/presentations—drawing attention to the main points by using a contrasting/bold colour next to otherwise grey or black text.

So I challenged myself to try to find things that could exemplify a good (or bad) use of colour.

I found a new building on the University of British Columbia campus that had some fairly striking colour (well, at least, compared with most of the buildings on campus).

image

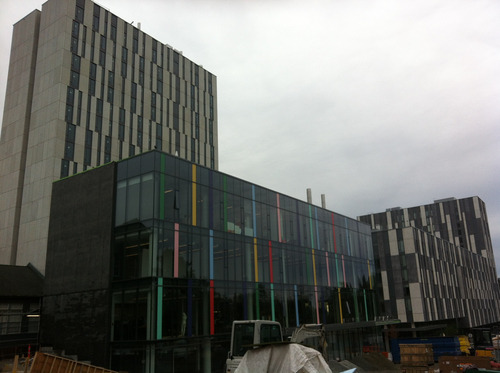
 https://secure.flickr.com/photos/clhendricksbc/10220221885/

There’s a good deal of construction going on around this building, thus the mess in front of the building. I think this building really stands out in contrast to those next to it, which are shades of grey (as is the sky, which is unfortunately a common look to the sky here in Vancouver, BC).

Here’s a bright yellow staircase inside the same building.

image

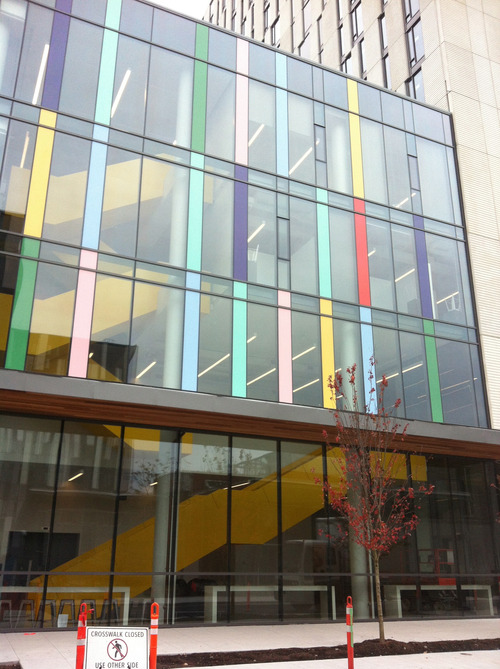
 https://secure.flickr.com/photos/clhendricksbc/10220340543/

As I was looking at this building, I was struck by how much I was thinking of such bright colours being connected to children. Maybe it’s because I have a 6-year-old, and most of his toys are really brightly coloured. Why are bright colours so prevalent amongst children’s toys and environments designed for children, but less so for other environments or objects? Or maybe it’s just the sorts of things I come across in my life that don’t have bright colours. And my own preference is for more muted colours, in my own wardrobe and indoor environment.

Perhaps unsurprisingly (?) This building is an “art centre” of some sort (not sure what exactly it is). But one of the new buildings of the Business school on campus also has some pretty bright colours, so maybe the fact that this building has to do with art makes little difference.

Is this a good use of colour? Honestly, I have no idea. Are the colours used complementary in some way? Should they be? Why are these particular colours used, and why are some colours on top of others—what guided that choice? No clue. All I can go by is what seems pleasing to me, and I do like this one. I think the contrast of the colour and the dark-ish glass is nice, and the colours are spaced in a way that seems balanced.

Here’s another example of colour, but one that also connects, to some extent, with the form/function relationship.

image

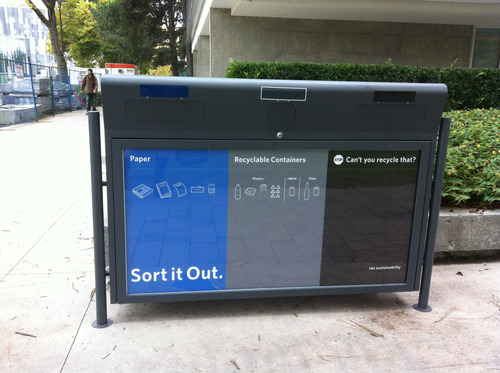
https://secure.flickr.com/photos/clhendricksbc/10220342543/

Sustainability is a big theme on the UBC campus, and this is one of the new bins one sees around campus, suggesting that we “sort” what we’re throwing away (in some buildings, and more and more as time goes by, there is also a place for compostable items).

I felt that the use of colour for this wasn’t terribly effective. The blue really stands out, which is fine—it’s for sorting paper in order for it to be recycled. The black is for trash, that which cannot be recycled or composted. Interestingly, there is no indication of that on the bin—it just says “stop: can’t you recycle that?” Okay, I guess most people can figure that out, and black does kind of fit the “not as good as the other stuff” category, or the “don’t put stuff here” category (consider whether it can be recycled).

But the grey I don’t think works. It is for “recyclable containers”—bottles, cans, plastic containers. But it just fades into the background. It seems like something I should ignore. I think it’s a poor choice for this “sort it out” campaign, as I don’t really pay attention to what’s in grey. Not a big deal, but I think another colour may have been more effective.

I spent last year in Melbourne, Australia, and I thought they had an effective way of using colour to distinguish rubbish bins from recycling bins. Rubbish bins in parks, building, even in our apartment, were green, while recycling bins in the same places were always yellow (or rather, had yellow lids). Okay, Australia has yellow and green as national colours, so it makes sense, but the continuity was really helpful too. One wouldn’t have to think too much when tossing stuff, because the colour signalled where to put things right away.

Balance

According to this article, “Balance is an equilibrium that results from looking at images and judging them against our ideas of physical structure (such as mass, gravity or the sides of a page). It is the arrangement of the objects in a given design as it relates to their visual weight within a composition.” The article was really helpful in explaining the idea of balance, both symmetrical and asymmetrical, with simple graphics.

According to the article, “Symmetrical balance occurs when the weight of a composition is evenly distributed around a central vertical or horizontal axis. Under normal circumstances it assumes identical forms on both sides of the axis. When symmetry occurs with similar, but not identical, forms it is called approximate symmetry.”

Here’s an example of “approximate” symmetrical balance. It has such balance on the horizontal axis, with the male and female figures, as well as on the vertical axis, with the “R” beginning both words.

image

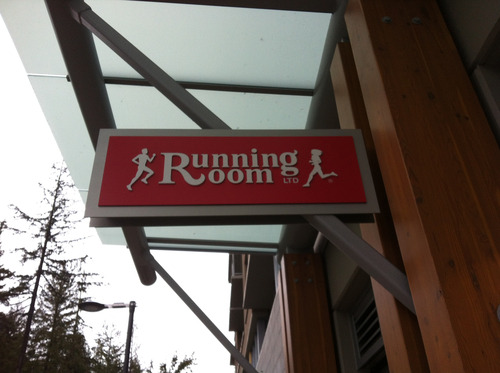
https://secure.flickr.com/photos/clhendricksbc/10220090194/

There is also “radial symmetry,” in which elements are arranged equally around a central point, such as here, in the UBC Museum of Anthropology logo:

image

Of course, on their website (from which this screenshot was taken), they cut off two of the radially symmetrical forms in the middle, which is actually a kind of symmetry itself.

This poster may exemplify asymmetrical balance—it approximates radial symmetry, but departs from it at the top left. (Sorry—photo not in focus!)

image

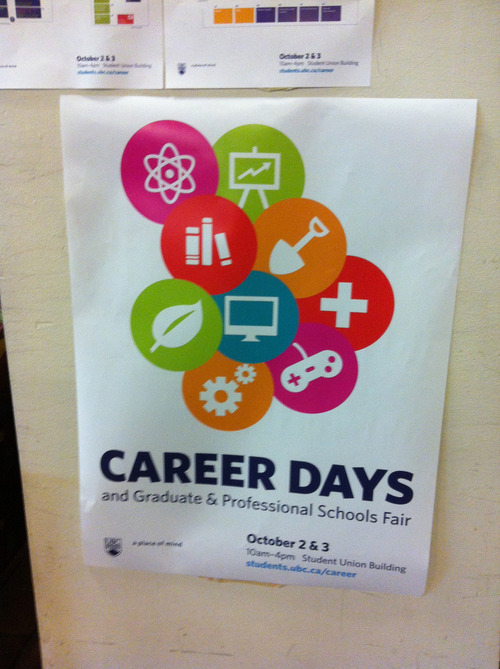
https://secure.flickr.com/photos/clhendricksbc/10220089164/

I prefer this kind of asymmetry to one in which the circles would be perfectly symmetrically arranged around the middle blue one—that would be less interesting. Is it balanced, though? The article linked above states that “involves the arranging of objects of differing size in a composition such that they balance one another with their respective visual weights.” The two top circles are not balanced by anything else in the image. Somehow this doesn’t bother me in the design, though. Maybe balance doesn’t always need to be achieved?

Colour stands out here too, of course. Several of the colours are pretty close (red, orange, pinkish), which makes the green and blue stand out. I don’t think there is any particular reason for those icons to stand out in this poster, given what it’s for, but it does show how contrasting colours do draw attention.

Minimalist design

I’m not certain exactly what makes a design minimalist, except that it has very few elements and tries to distill meaning or a message down into a kind of small package (for lack of a better way of putting it at the moment). I had a hard time finding minimalism as I was walking around the city and the campus, but I think this would count.

image

https://secure.flickr.com/photos/clhendricksbc/10220228395/

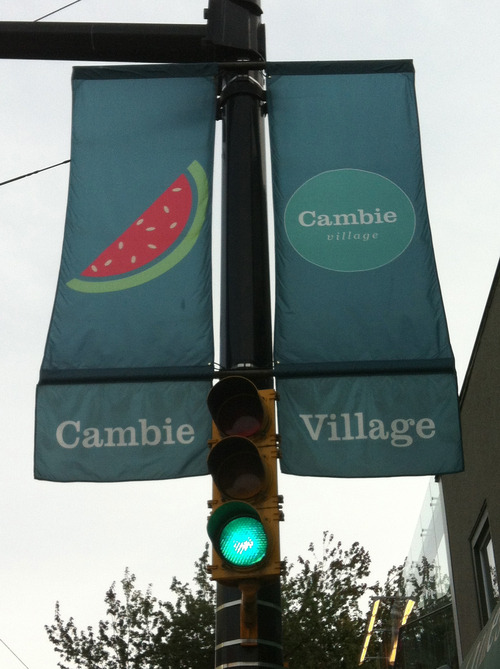
You see these flags all around various cities these days, including Vancouver, marking particular neighbourhoods. This is the most minimalist set of such flags I’ve seen. They all had just one simple image on them, along with “Cambie Village” in a circle. 

The main problem I found with this is that I couldn’t for the life of me figure out why there’s a picture of a watermelon as being somehow connected to this neighbourhood. Is this a place to get fresh fruit? To spend a nice sunny day in the summer? I have no clue, and in that sense I think this design is not as good as it might be. I wish I could remember what some of the other images were, but alas.

Here’s another minimalist design.

image

https://secure.flickr.com/photos/clhendricksbc/10220140824/

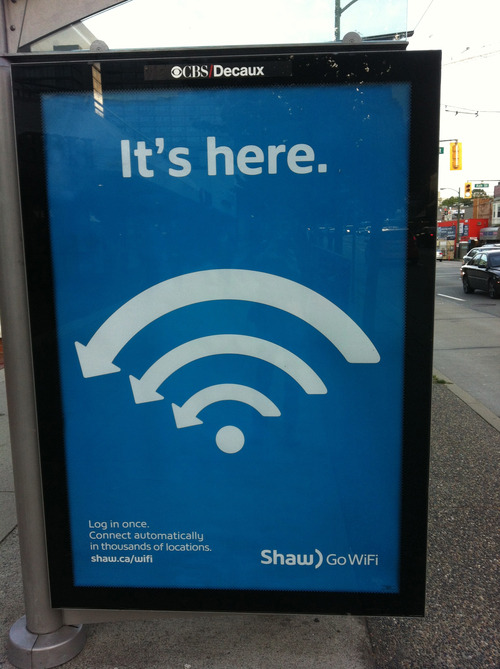
Quite distilled down, definitely. Though I’m not sure why there are arrows going to the left. Maybe pointing to the copy at the bottom left? Maybe having to do with “Go” in the “GoWiFi” tagline? But the “it’s here” works well, I think: meaning, (1) it’s arrived, and (2) you can find it here, there, and lots of other places.

Rhythm

I got this one wrong when I was first walking around taking photos. I was thinking it was just design elements that indicated movement and flow. But according to this site, “Rhythm is the repetition or alternation of elements, often with defined intervals between them. Rhythm can create a sense of movement, and can establish pattern and texture.” Oops. Got the movement part right, but not the repetition part, when I took the following picture.

image

https://secure.flickr.com/photos/clhendricksbc/10220248766/

Not the best shot, because the “wave” on the glass of this bus shelter gets kind of lost with the street behind it. Still, I thought it gave a sense of movement, and maybe even rhythm, but I didn’t remember the idea of repetition.

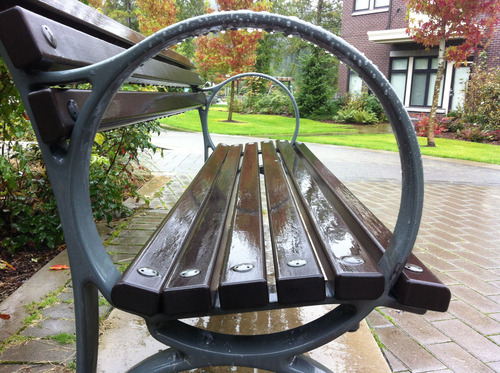
But hang on, look at the bench from the side.

image

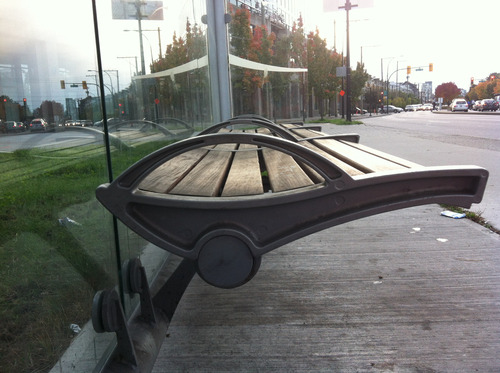
https://secure.flickr.com/photos/clhendricksbc/10220247576/

Rather a similar movement, I thought. I wasn’t taking this one because I was thinking of repetition, but because I noticed that the bench had a similar kind of wave form. But hey, it’s a type of repetition, right? Wall and bench of the same bush shelter?

Typography

My favourite suggested resource from design week was this page, which is about typography for lawyers, but really has lots of useful information about typography itself and various font examples, for anyone.

Still, while out walking around, I didn’t find many great typography examples (or even bad ones)…just ones that didn’t stand out much one way or another. Of course, I could have gone looking on the web, but I wanted to do this assignment outside mostly because I spend way too much time on my computer anyway.

There is a new Student Union Building being built on the UBC campus, and while that’s happening the old one is still open and (mostly) fully functional. There’s quite a campaign going on to let people know that, and it has retro feel, supposedly because it’s the “old” SUB (I’m guessing here). 

Here’s a sign that uses a font reminiscent of retro “we are open” signs, at least so far as I remember.

image

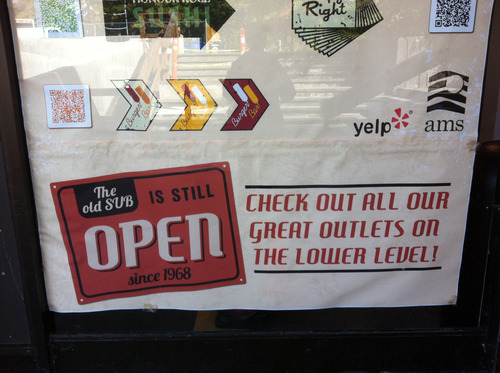
https://secure.flickr.com/photos/clhendricksbc/10220339563/

And the font for “Last Call” on this sign is suitably retro as well. It is very much familiar to me, but I can’t place it. I mean, it seems to have the right feel, but I’m not sure why, where I’ve seen it before.

image

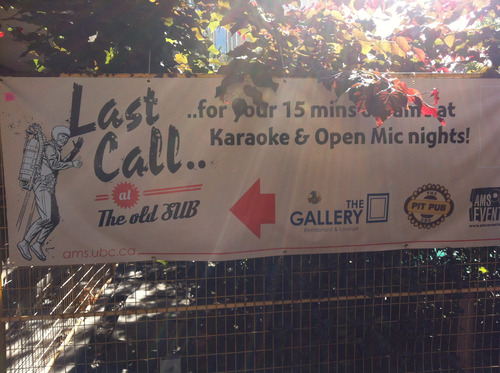
https://secure.flickr.com/photos/clhendricksbc/10220087634/

A number of these signs, like this one, are posted on the barriers around the construction site. The new not yet here, the old still beckoning.

Well, that’s certainly plenty for one design safari. It took me over a week to finish this blog post, and probably it’s far too long for anyone to read through the whole thing. 

This was an excellent way to learn some design principles, and I’m so glad I took the time to do it this time around.

Rainy day photoblitz

Week five of the Headless ds106 course is about telling visual stories in photos. One of the assignments we could do is a “photoblitz,” in which we take as many photos as we can in 15 minutes, trying to adhere to several suggestions for them amongst a list of possibilities (see previous link for the photoblitz assignment).

Today, Saturday, was the first chance I had to take the time to do this, and, of course—it being Vancouver, BC, after all—it was raining. But actually, this ended up being pretty cool in terms of photos, I thought. Okay, no shadows to play with, but some nice effects nonetheless. The hardest part was holding an umbrella while taking pictures. I used my phone just to see what it could do, which made the one-handed photo-taking easier. Sure, I could have just worn a raincoat, but I was going out later and had a fancy wool coat on. So umbrella it was.

As usual, I’m not thrilled with my phone photos. The focus is not great, usually, especially with the somewhat low light there was today. But some of the images turned out okay.

We were to start and end with images of something that shows the time, so we could capture the 15 minutes that way. So here’s the first image:

image

We were asked to pick our best five to upload to Flickr with the “ds106photoblitz” tag, and I did five not counting the “time” images.

This one follows the suggestion to “take a photo dominated by a single color.”

image

I wrote this about this image when I posted it on Flickr:

“These planters are in a pool of water in front of a building, where the rest of the outside landscape seems very “natural,” with water, pebbles, plants, etc. They stand out, though they don’t look quite as bright as they do in the image. That’s one of the reasons I like this image. They seem to shout at me here.”

The red looks almost artificial, almost too much, really in-your-face. But I didn’t do anything to the photo after taking it—this is how it came out. And I like it this way.

Here is a photo that “represents the idea of “openness.”

image

I liked that there were two open circles in this image, as well as converging lines (another one of the suggestions—two in one!). I think the rain makes the lines stand out even more due to the reflections in the water.

Here’s where you can find this image on Flickr.

This photo “emphasizes mostly dark tones or mostly light ones”:

image

This one emphasizes both light and dark tones, though when I took it I was thinking of it in terms of dark ones. There were a lot of dark tones around me today, but as I wrote when I posted this one on Flickr:

“I was happy to find a place to take a photo where there was one thing that stood out as different from the rest. I love the colour of this tree as well as that of the greenery behind it, and especially how the two contrast.”

As I noted already, with the rain today there were no interesting shadows. Except I made some with the phone by taking pictures of the trees against the grey sky. So here’s my interpretation of “take a photo of an interesting shadow.”

image

I thought I might have to play around with the colour saturation on this one, but it looks pretty good on its own, like a b/w image even though it’s colour. I took several of these with different trees, and most did look like they were green trees against a grey sky. This one had both the most interesting tree “shadows” and almost looked like shadows.

Here is this image on Flickr.

The last image is one taken from “an unusal angle.” The iPhone makes this easy with the ability to take pictures with a forward-facing camera. held it under some flowers:image

This one I did adjust using some settings in iPhoto. I played with the exposure, saturation and tint, to get more of the effect of transparency in the petals, and to make the colour stand out more. I also like the placement of the flowers in the frame of the image, though I’m not sure why, exactly. I just think it looks good.

I don’t know if altering the photos is part of the photoblitz idea, but here’s the original for comparison:

image

I like the new one much better! (I also cropped it to cut out the line at the bottom.)

Here’s the enhanced version on Flickr.

I finished a little bit late, as you can see (didn’t watch my watch carefully enough!). But it was pretty close to 15 minutes.

image

I was also cold and wet by this time, and I spent the next hour or so in a coffee shop, watching the rain pour as I prepped a lecture on Epicurus!