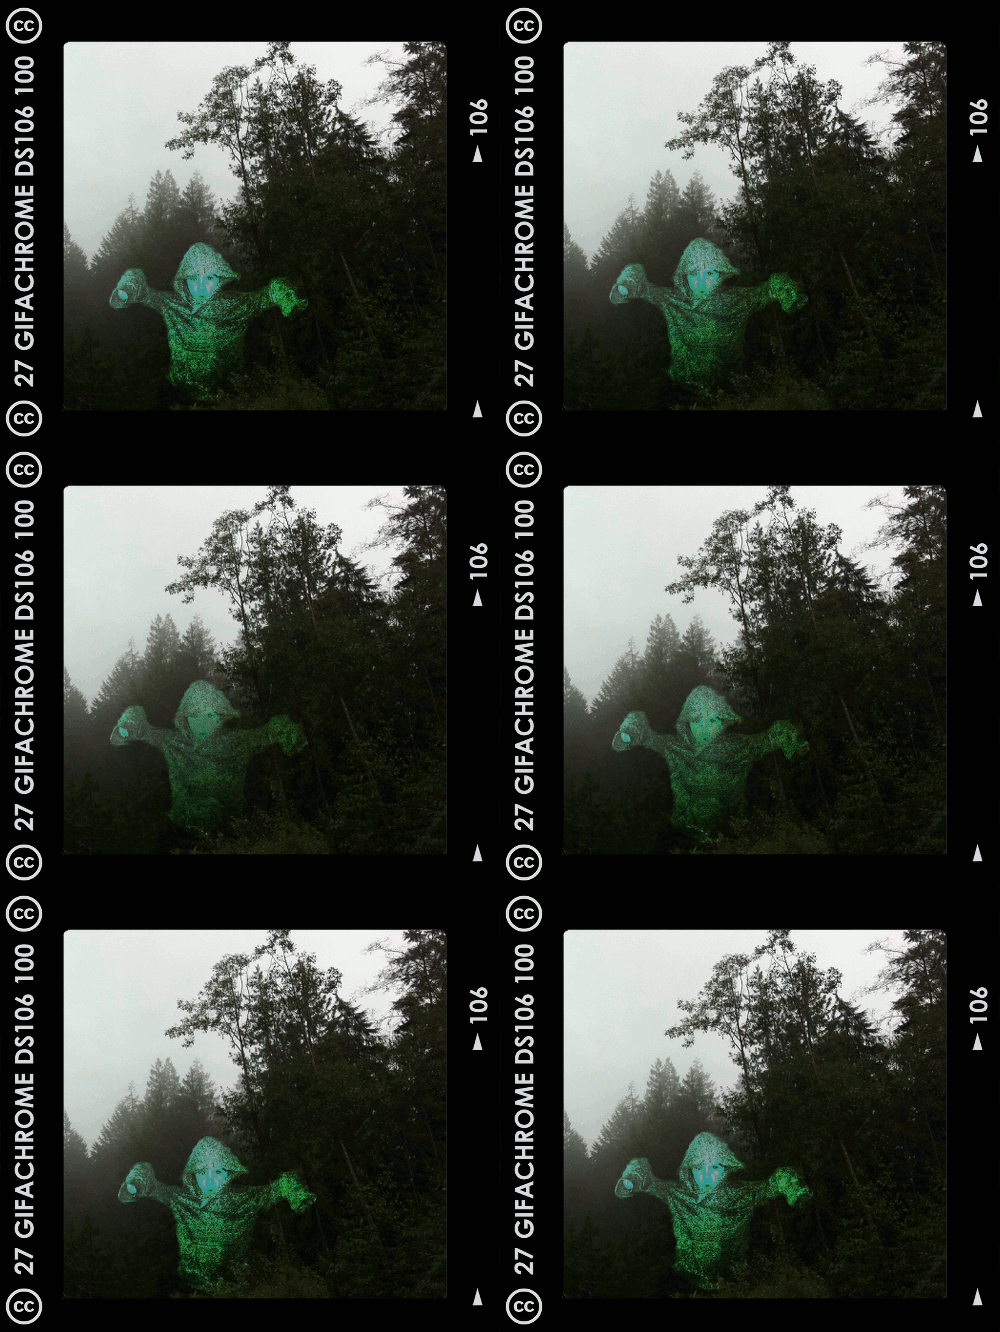
How I got the boo ghost into the GIFaChrome film

image

The past two weeks have been a blur. For the last two weeks of the Headless13 installment of ds106, several of us have been working together on a group project around a fictional camera called GIFaChrome.

How did this come about? While I was utterly swamped with work, I one day noticed a tweet or two referring to blog posts or G+ posts that had to do with something called “GIFaChrome.” Here is a page with a few Storify stories that explain how it all unfolded. The short story is that Rochelle Lockridge came up with the idea of putting an animated gif into a film frame and lots of people added in their ideas from there, including that there should be a camera that takes images and turns them into gifs (I think that was Mariana Funes’ idea). Then came the idea of putting glitched gifs into the frame, and so GLITCHaChrome was born (can’t recall the provenance of that one). John Johnston developed “LayerCake,” which allows for images to move OUT of the frame! There is also GIFaKidChrome, which makes animated gifs from the audio of children’s stories—that one was the product of spontaneous riffing on an image that originally came from a daily create assignment, a spot of riffing I was so sorry to miss but loved watching unfold.

I’ll do another blog post soon reflecting further on this GIFaChrome project and the Headless 13 course as a whole. This post is dedicated to explaining how I did the gif at the top of this post. This was meant to be part of the GIFaChrome story, as a testimonial from a beta tester (see my previous post)

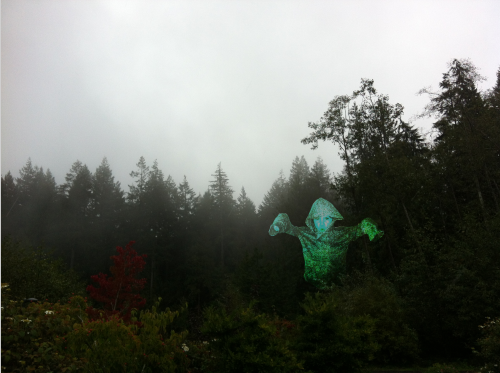
For a daily create earlier in the course we were asked to make an image of another ds106 participant as a ghost. I was trying to do one of someone else when my son heard about what I was doing and insisted he wanted to be in the picture. Thus, he is the ghost.

Making a gif from the original image

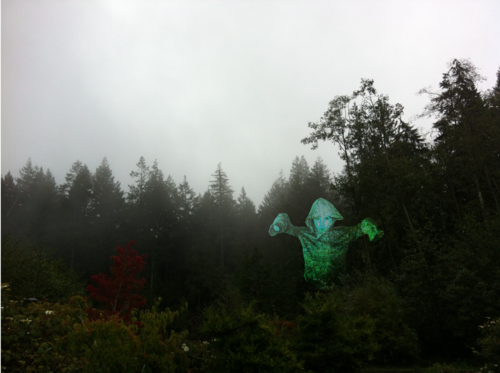
Here’s the image I started with, which I made in GIMP. Here’s a link to it on Flickr, in which I explained briefly how I made it. 
image

When I made this image in GIMP I had two separate layers, the one with my son as a ghost and the background forest layer. That made it easy to create a gif out of the image.

Before duplicating layers, I used the “blur” and “smudge” tools around the outside of the ghost layer so it didn’t look quite so “cut out” but more blended into the background a bit.

1. I first duplicated the image of my son as a ghost several times so I could have multiple layers to move around.

2. I wanted the ghost to “glow” a little, so what I did was select a layer, go to Color->Brightness-Contrast and played with the contrast a bit. Then I did the same only a little more for the next layer, and again for the next layer, then I started dialing it down gradually by the same amount for the next few layers so it would pulse a bit.

3. Then I moved each ghost layer a little bit to try to make the movement look smooth and somewhat ghost-like. At first I had the ghost move around in a circle, but my son nixed that: “Ghosts don’t move in circles, mommy. They move up and down.” Okay, so I started over and made it move up and down (and a little bit side to side too, even though that wasn’t what I intended at first). I had to keep making various layers visible and invisible (by clicking the “eye” icon next to them) so I could see how the ghost would move when it cycled through each layer. 

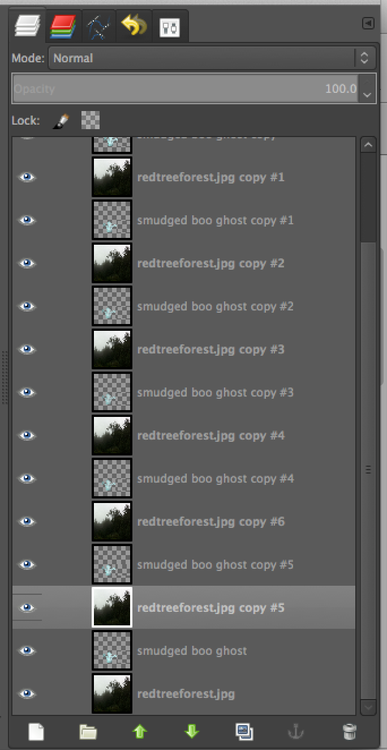
3. In GIMP, if you go to Filters->Animation->Playback you can see what the animated gif will look like. Except that if you just have a bunch of ghost layers and one background layer you’ll just see the ghosts move and then the flash of the background. To see the finished product as it would really look, I had to duplicate the background so I had as many background layers as ghost layers, and put a background layer under each ghost layer.
image

Then I had to control-click on each ghost layer and choose “merge down” so that each ghost layer merged with the background layer under it. Then, when going to Filters->Animation->Playback I could see what it would really look like.

5. The problem was that if I didn’t like the movement and wanted to re-do it, I was unable to do “undo” for enough times to get the layers unmerged. I was able to use “undo” for most of the layers, and then it just wouldn’t go back any further. So I’d have to close the file and start over, which kinda sucked because then I had to re-do the glow again from step 2. Boo.

6. Finally I had a nice looking gif, but the file was too big. So I first used the “crop” tool to crop the image to approximately a square, and then went to Image->Scale image to get it to about 450px x 450px.

Putting the GIFaChrome frame around the gif

Rochelle Lockridge provided a GIFaChrome template on her blog, which I downloaded. It was a photoshop file, but turns out that opened in GIMP just fine.

Here’s what I did to get my gif into the frame.

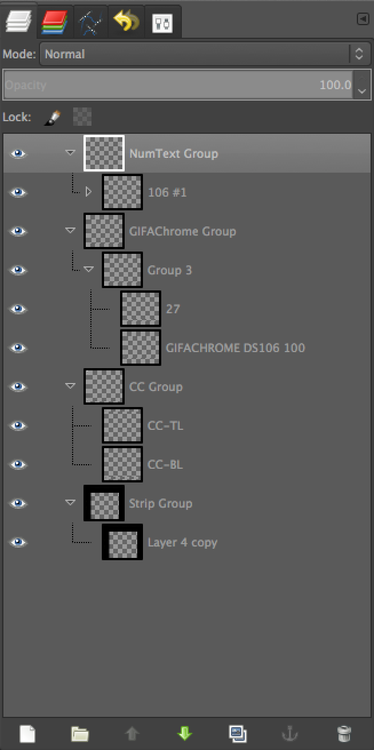
a. I first opened the GIFaChrome frame template in GIMP, and tried to use File->Open as layers to open up my GIMP xcf file with the gif I had just made. But what it kept doing was opening it up in one of the “layer groups” in the template file, which wasn’t going to work for animation. The screenshot below shows the various layer groups in the template files.
image

I realized I’d have to somehow get these groups into one layer so I could copy that layer and put it above each of the layers in my animated gif. 

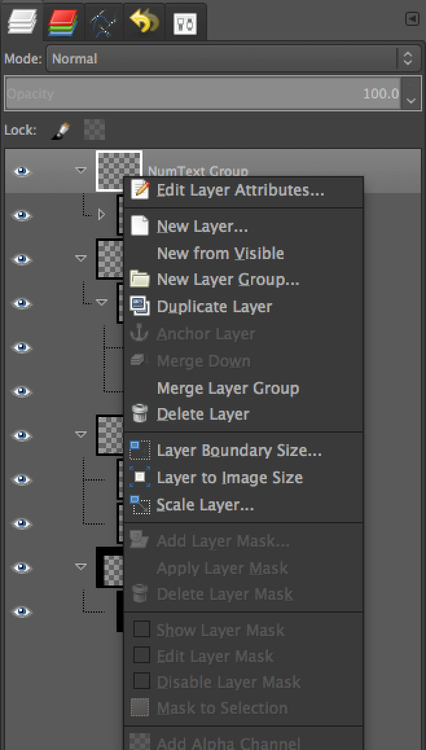
b. I discovered how to do this. First, I control-clicked on the top layer in one of the layer groups and chose “Merge layer group,” which put all the parts of the layer group into one layer.
image

That gave me four layers instead of four layer groups. Then I had to get all those layers into one layer so I could duplicate the whole thing easily. I just control-clicked on each layer and chose “merge down” until I had one layer.

c. Then when I did File->Open as layers and opened the GIMP xcf file with my ghost gif in it, it simply opened all those layers onto new layers, not in any layer group. Perfect! 

d. Of course, the frame layer was not the right size for my animated gif layers, so I had to scale the frame layer down so it would fit.

e. I duplicated the frame layer enough times to put one above each gif layer, and then used control-click on each frame layer and chose “merge down” (just as in step 3, above). Voila! I had layers that would animate as a gif just fine. 

On the GIFaChrome website, this gif has sound attached, I think through the way John Johnston explains here. I don’t think I can do this on Tumblr, though maybe through the “html” function it would work. At any rate, it’s his own voice to go along with the image!

This is a guest post by the boy ghost in the image above, who…


This is a guest post by the boy ghost in the image above, who has chosen to remain anonymous.

I am so thrilled about my beta test of the GIFaChrome camera! I was able to get a version of the camera from my friend Ina, and she kindly agreed to take an image of me that shows my real nature. If you hover over the right side of the image above you can see an arrow pointing to the old image Ina took of me, a boring old still image. It does me no justice, as you can tell when comparing it to my GIFaChrome image. Whoever heard of a ghost that doesn’t glow and move?

This camera is so easy to use: all you do is point and click and a beautiful animated gif appears. It’s like magic! You don’t even have to have full material substance to work the thing, as I have been able to play around with it myself (though I still need practice, and this pic by Ina is the best image so far).

The only thing that is missing from the GAC image is my lovely “booooooo-oooooooo-oooooo” sound that I tend to make when floating in this way. But those people over at GIFaChrome are so clever, I expect this will be available in a software update soon!

The GIFaChrome launches December 13, 2013. To pre-order yours, go to the GIFaChrome website!

Here is my ooooooo-oooooooo-booooo sound, just so you know what a lovely voice I have!

Remembering and misremembering

Remembering and misremembering

The Story

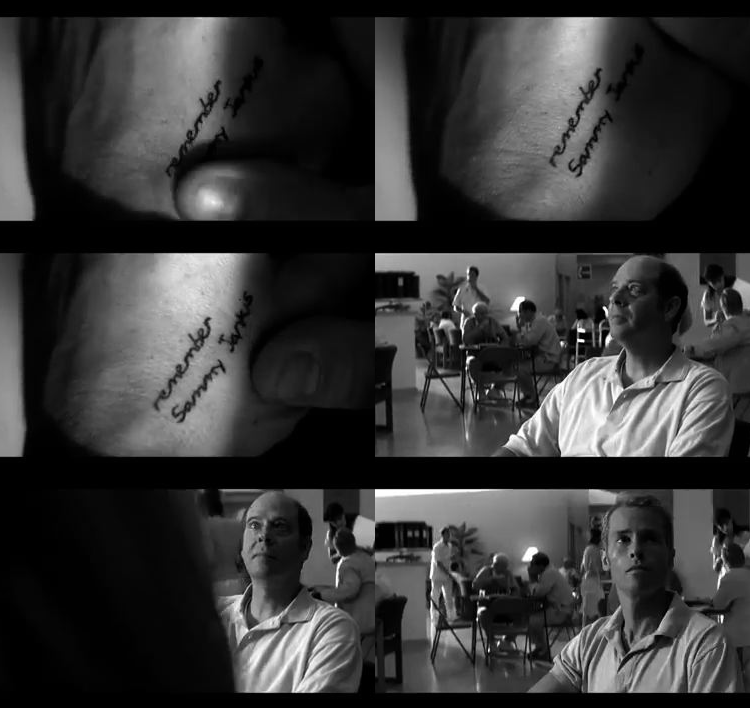
This animated gif is for the second week of the Headless ds106 for Fall 2013, in which we were asked to do a gif of a scene from one of our favourite (or least favourite) movies.

I immediately thought of Memento, a film I really, really liked when it came out back in 2000. I had seen it a couple of times over the years, but decided to watch it again for this assignment. I found that I had forgotten much of the film, which is not unusual for me—I am not sure that I have a memory “problem” (and certainly nothing on the scale of Leonard Shelby, in the film), but I do have an uncanny knack of forgetting things quickly and easily and regularly. Not just the usual things, like where I put my keys, or what I had for breakfast (though, since I usually have the same thing every day, that’s pretty easy), but things like novels I’ve read, films I’ve watched, how stressed I was last time I taught courses in a certain way—a convenient one for when I’m planning new courses and have all these grand ideas about what to do and I forget how much time all that is going to take.

I do often find that I can re-watch a movie, or re-read a book after a couple of years and it’s almost like new again. Or at least, it has a tinge of the familiar, and a few things will really stand out as recognized, but for the most part it’s like having a new experience. Which is both troubling (what’s wrong with my brain?) and enjoyable (hey, I get to enjoy this story all over again!).

The main character in Memento, Leonard Shelby, is played by Australian Guy Pearce, whom I watched last year in two “tele-movies” filmed in my neighbourhood in Melbourne, where I was living at the time (here’s the trailer for one of them). He’s also pretty famous for his role in The Adventures of Priscilla, Queen of the Desert (trailer). When I first saw Memento, I didn’t make the connection to the Priscilla film, and didn’t realize Guy Pearce was Australian. Watching Memento this time around, I now have a sense of him as an Australian actor, so it was interesting listening to him speak with an American accent.

The main premise of Memento is that Leonard Shelby has a memory issue: after an attack that caused some neurological damage, he is unable to make new memories. Or rather, he can make some, but they disappear after a short time (it’s not clear in the film how long he can retain his memories, but something on the order of 15-20 minutes maximum, I think). After they disappear, he finds himself somewhere and doesn’t know where he is, why he’s there, or what he’s doing. He does, however, remember everything that happened before the attack.

To compensate for this problem, he often tattoos important things on his body, things he decides he must tell himself. He also tells himself things by writing notes to himself, but the really important ones are tattooed.

One of his memories from before the attack is of a man named Sammy Jenkins, who suffered the same problem that Leonard now does. Leonard was a claims investigator for an insurance company, and he denied Sammy’s wife’s insurance claim because tests indicated that physiologically, Sammy should be able to make new memories; the issue seemed to be psychological, and Sammy didn’t have insurance coverage for psychological issues (oh the joys of the U.S. medical and insurance system).

One of the great things about the film is that it is presented in nearly as disorienting a way as Leonard’s life must be—there are fairly short scenes that jump around in time, leaving the viewer disoriented and wondering what is going on. It starts at the end of the story, and while parts of it move backwards from there, other parts move forwards. It’s very difficult to get a handle on what is happening at any given time, until towards the end, when essentially you’re back at the beginning.

There is a lot more going on in the film, but that’s enough to explain this animated gif. I took parts of two different scenes: one where Leonard sees the tattoo on his hand telling him to remember Sammy Jenkins, and one that is a vignette of Sammy Jenkins in a psychological institution of some sort, watching someone go by.

Now, why does Leonard need to remember Sammy Jenkins? The idea given directly in the film is that Sammy couldn’t do well with his condition because he didn’t have a good system for writing notes and organizing them so that he could have a semblance of continuity in his life. But as the film progresses, and especially in the scene where Sammy is sitting in the institution watching someone go by, one begins to wonder if Leonard’s memory of Sammy is correct. Specifically, is Leonard mixing memories of his own life with those of Sammy? Sammy ended up inadvertently doing something very horrible; was it actually Leonard that did this?

“Remember Sammy Jenkins” is tattooed on Leonard’s hand, in a place where he’ll see it often (as opposed to under his shirt or pants, for example). It’s clearly important. But several times throughout the film Leonard is shown rubbing at this tattoo, as if trying to get it off. Trying to not remember. And perhaps he is trying to not remember what he himself has done by remembering it as Sammy Jenkins doing it instead.

At one point in the film, Leonard decides to consciously lie to himself, to write himself a note that he knows at the time is wrong, but he wants his later self to believe it and to act on the basis of it as if it’s true. Which, of course, throws all of Leonard’s notes to himself into question—how much of what he now believes as true may be his own fabrication? Not to mention a fabrication by others who are using him for their own purposes.

Beyond these interesting aspects of the film, it also raises larger issues about memory and our understanding of our lives and the world around us. Sure, Leonard’s memory is faulty, but so is all memory to some degree. And though he knows at one point he is lying to himself to make himself think differently in the future, later he won’t realize that’s the case.  And isn’t such a thing perfectly possible for those of us with “normal” memory, if even less consciously? How much do we alter our own memories without even realizing it?

I have fairly frequently been told I seem to selectively forget certain things, usually negative ones, and imagine the past was better than it really was. But I actually rather prefer it that way.

The process

I found several clips of the film on YouTube, and downloaded them using Clip Converter. I selected the parts of the two separate clips I wanted using MPEG Streamclip, and then imported them into GIMP (see this tutorial for how to make an animated gif with MPEG Streamclip and GIMP).

I had way too many layers/frames (they are both the same in GIMP) at this point…my animated gif needed to be 1MB or less to animate in Tumblr, and I knew I’d be way over that. So I just deleted every other layer, which is a nice way to save file size and still keep the animation pretty smooth. I also took out a few more layers at the beginning of each clip—anything that didn’t seem essential.

One thing I always run into with GIMP is that the animation works backwards—it starts from the bottom of the layer stack and goes up. So you have to rearrange the layers if you want it to go in the right order (sometimes this doesn’t matter, depending on the gif, but for this one it does). When I first started I moved layers one by one, but recently discovered that there’s an easier way to do it: go to “Layer” on the top menu, then “Stack,” then “Reverse layer order.” Voilà! Easy.

The file was still too big when I exported as a gif, so I had to make it even smaller by making the “canvas” even smaller (the dimensions of the whole gif). I just kept using the square selection tool and selecting smaller pieces, then going to “Image,” then “crop to selection,” then exporting as gif to see if it would be small enough. Even though the image was already b/w, I switched it to greyscale instead of RGB (“Image,” then “mode,” then “greyscale”). Not sure that made much of a difference, really.

Finally, while I wanted the tattoo clip to go a bit more slowly than normal, I wanted the Sammy in the institution scene to go quickly. The bit at the end of that clip goes by very, very quickly in the film—so much so that I had to watch it a few times to be sure what was going on. Can’t do that in a theatre! I didn’t want to slow it down too much, though it is slower than in the original film.

I managed these differences in speed two ways:
1. For the institution clip, I set the rate of each layer specifically: at the end of the name of each layer I put “(125ms)”, which tells GIMP to have that layer run for 125 milliseconds. I did that for all the layers in that clip.

2. For the rest, I just set a layer rate for the whole gif when exporting it; there’s an option to set the rate for all unspecified layers, which I set at 200 I think (maybe a bit more).

I had a lot of fun with this, and have been waiting several days to find the time to blog it. Glad I finally did!

Ahhhhhh! The hand! The hand!

Ahhhhhh! The hand! The hand!

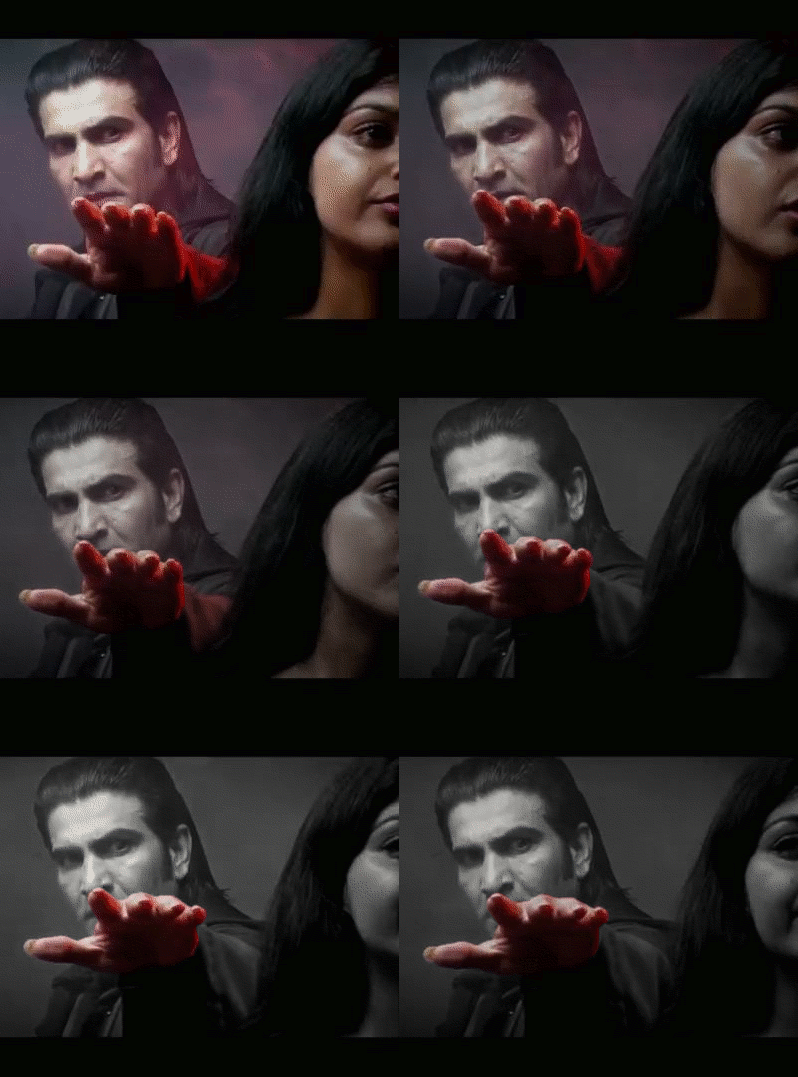
This is for August Animated GIF challenge #10: Monster Chiller Horror Theatre 3D style GIF. It is also a new animated GIF assignment on ds106. The idea is to find a 3D style movie scene and somehow

find your own way to emphasize the moving of a thing out of the screen and into your face in a GIF.

I found this scene from a 3D Dracula movie trailer on YouTube.

I wanted to try to emphasize the hand moving out of the screen somehow, and came up with the idea of selectively colourizing it. I discovered that if I selected the hand with the lasso, or free select tool, and then inverted the selection (so everything but the hand was selected), then I could go to Colors -> Desaturate, and it would make what was selected b/w (everything but the hand) but not what was unselected (the hand).

I did a few layers that way, but then realized that what would be really cool is if it started off in full colour and gradually went to b/w except for the hand…like the hand was really coming out at you while the background was fading into, well, the background.

So for the layers that would be first in the gif, I kept the first two full colour, and then gradually desaturated the next few: 20%, 40%, 60%, 80%, then one at 90% b/c I wanted another step there. How I did this was to free select around the hand, invert the selection, then use Colors -> Hue-Saturation, and chose the amount of desaturation for each layer. Then the last layers of the gif were full desaturation.

What took the longest, of course, was doing the lasso/free select tool around the hand on each layer. There were a couple of layers where the hand didn’t move very much, so I could keep the selection from one layer and use that for the next layer too, for desaturation purposes. But for most of the layers (12 total, 10 desaturated to some degree) I had to do a new free select around the hand each time.

I actually started off with twice as many layers as I ended up with, and deleted every other layer to end up with half as many. That saved a lot of time, and made the gif file smaller. Desaturating most of the image made the gif file smaller too.

I realized too late that I wanted to have more of the full colour and gradual desaturation layers, so the desaturation was more gradual. But I’d have to re-do all the free selecting to change the saturation level on any of the layers. So instead I just slowed down the first few layers by putting the time in milliseconds I wanted them to last after the layer name (e.g., “full colour (300 ms)”). Then when I exported as a GIF, I chose something like 200 ms for all the layers that weren’t otherwise specified for length. The first few layers go a bit slower than the last ones that way. It’s not quite the effect I wanted, but it’s close. If I were to do it over again I’d have more full colour layers, and do the desaturation more gradually, over more layers, with just a couple at the end fully desaturated.

Finally, I used a new trick I learned from Alan Levine’s comment on my last post, as well as Talky Tina’s reply on Twitter: dithering. When I was done with the layers, I went to Image -> Mode -> Indexed (because GIFs get indexed when exported anyway), and chose the fullest number of possible colours (256 for a GIF) and clicked the check box for dithering. I played around with several dithering options, and just used the first, which is called “Floyd-Steinberg (normal).” And I didn’t get the colour banding I’ve been getting on my other GIFs! Sure, the quality isn’t perfect, but it’s an animated GIF, after all.

I had a lot of fun with this one, even if it took me awhile to finish because of the hand lassoing of most of the layers!

And I think my favourite part is that—ha ha!—Dracula never gets to grab the woman. He keeps trying and trying and he never does it. A nice twist on the fact that these horror creatures continually attack women. Not this time. In your FACE Dracula!

Why are my GIFs so pixelated?

This title is a bit of a misnomer. It’s a question I’ve asked, directly and indirectly, on this blog for the last couple of posts. And I think I’ve finally found the answer, so really it’s not so much why my GIFs are pixelated that I’m wondering at this point, but why others’ GIFs are not.

The pixelation I’m talking about

You can see it in the following GIFs I’ve done recently. Note, I’m using GIMP.

And what I’m talking about is that the colours get all pixelated. I didn’t have this issue with the GIFs I made during the #ds106zone—those were all black and white. That was a clue to what is going on…something with colours.

Why it happens (I think)

After numerous web searches last night, what I came up with as the cause is probably that the original images I’m using for the GIFs are in RGB colour, and GIFs have to be in indexed colour, at a maximum of 256 colours. So when the image is exported as a GIF, it reduces the colours and I get this.

The text on the Scottlo GIF is a different matter. I’m not certain what causes that, though maybe it has to do with anti-aliasing and semi-flattening, as discussed here? Ideas?

What can be done?

I don’t know. Any ideas? I thought at first maybe I was just out of luck because GIFs have to have smaller numbers of colours.

But that can’t be all there is to it, because other people have been making GIFs in colour and they look better. Sure, there’s still some of this pixelated colour stuff, but it seems not as bad, I think.  See, for example, GIFs by Talky Tina, John Johnston, Rockylou, Andrew Forgrave.

So what are they doing that I’m not, besides using other programs than GIMP, and can I do in GIMP what they’re doing?

Or am I just being too picky about how my GIFs look? Entirely possible!


Thanks to any and all who have ideas. Much appreciated!